ABSYZ ABSYZ

  • Home

    Welcome to ABSYZ

  • About us

    Who We Are

  • Our Expertise

    What We Do

  • Our Approach

    How We Do It

  • Products

    What We Made

  • Industries

    Who We Do It For

  • Clients

    Whom We Did It For.

  • Article & Blogs

    What Experts Think

  • Careers

    Join The Team

  • Get In Touch

    Let’s Get Started

ABSYZ

Creating a Modal Dialog box using Lightning Design System – Lightning Component

Home / Article & Blogs / Salesforce / Lightning / Creating a Modal Dialog box using Lightning Design System – Lightning Component

Creating a Modal Dialog box using Lightning Design System – Lightning Component

By Nitish inLightning, Salesforce

Hi All,
I was trying to build a modal dialog box in lightning component and it took me some time to figure out how to use svg tag and use it in Lightning component.

In this blog, I will try to create a Account List Lightning Component which will have a new Account create button.The new button will open a form dialog box which will contain the Account fields.On the click of Save the Account record will be created.

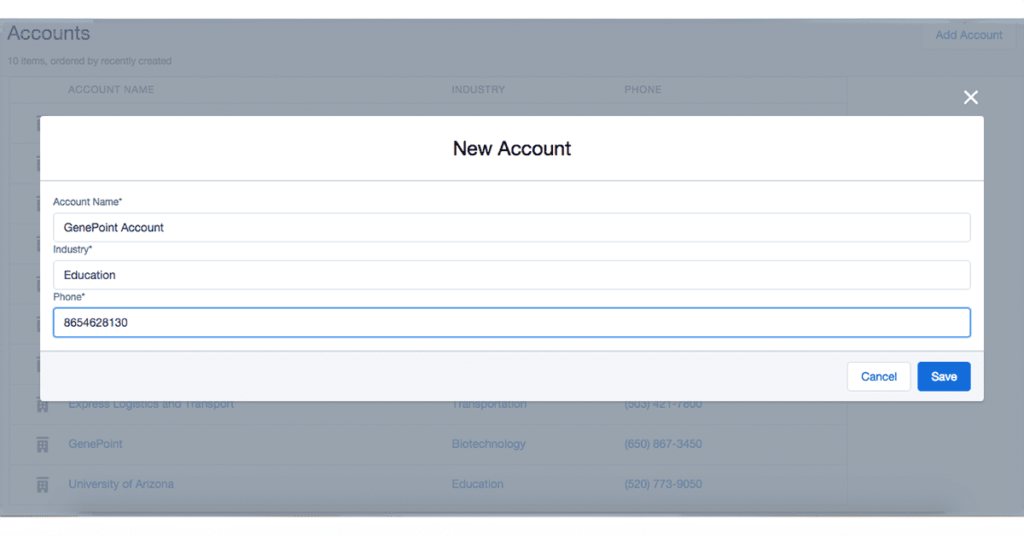
Attached is the screen of the Lightning App once you complete this tutorial.

AccountList

ModalDialog

Let’s first create a lightning component which shows a list of accounts

AccountListController.apxc :

[sourcecode language=”java”]
public class AccountListController {

@AuraEnabled
public static list<Account> getAccountlist(){

return [Select id, Name,Industry,Phone from Account Order by CreatedDate desc limit 10];

}

@AuraEnabled
public static void getAccountupdatedlist(Account newAcc){

insert newAcc ;
}

}
[/sourcecode]

Next Step is to get the Lightning design system.You can download the latest version from https://www.lightningdesignsystem.com/resources/downloads and upload it as a static resource.

Now, first lets create a reusuable Lightning component so that we can use svg tags to show images.You can follow salesforce trailhead to create this. (https://developer.salesforce.com/trailhead/en/project/slds-lightning-components-workshop/slds-lc-4)

svg.cmp

[sourcecode language=”java”]
<aura:component >
<aura:attribute name=”class” type=”String” description=”CSS classname for the SVG element” />
<aura:attribute name=”xlinkHref” type=”String” description=”SLDS icon path. Ex: /assets/icons/utility-sprite/svg/symbols.svg#download” />
<aura:attribute name=”ariaHidden” type=”String” default=”true” description=”aria-hidden true or false. defaults to true” />
</aura:component>
[/sourcecode]

svgRenderer.js

[sourcecode language=”java”]
({
render: function(component, helper) {
//grab attributes from the component markup
var classname = component.get(“v.class”);
var xlinkhref = component.get(“v.xlinkHref”);
var ariaHidden = component.get(“v.ariaHidden”);

//return an svg element w/ the attributes
var svg = document.createElementNS(“http://www.w3.org/2000/svg”, “svg”);
svg.setAttribute(‘class’, classname);
svg.setAttribute(‘aria-hidden’, ariaHidden);
svg.innerHTML = ‘<use xlink:href=”‘+xlinkhref+'”></use>’;
return svg;
}
})
[/sourcecode]

The next step will be to create a component to show the list of Accounts. We can use the reusuable svg component to add any images to the component by just passing the class and xlinkHref attribute in the component.

AccountListComponent.cmp

[sourcecode language=”java”]
<aura:component controller=”AccountListController”>
<ltng:require styles=”/resource/SLDS/assets/styles/salesforce-lightning-design-system.min.css”/>
<aura:attribute name=”accountlist” type=”Account[]”/>
<aura:handler name=”init” value=”{!this}” action=”{!c.getAccountlst}”/>
<table class=”slds-table slds-table–bordered” style=”width: 80%;border-right: 1px solid #d8dde6;border-left: 1px solid #d8dde6;margin-left: 2%;”>
<thead>
<tr class=”slds-text-heading–label”>
<th class=”slds-cell-shrink” scope=”col”></th>
<th class=”slds-truncate” scope=”col”>
<span class=”slds-truncate”>Account Name</span></th>
<th scope=”col”>
<span class=”slds-truncate”>Industry</span></th>
<th scope=”col”>
<span class=”slds-truncate”>Phone</span></th>
</tr>
</thead>
<tbody>
<aura:iteration items=”{!v.accountlist}” var=”acc”>
<tr class=”slds-hint-parent”>
<th data-label=”acc-name” role=”row”>
<c:svg class=”slds-icon slds-icon-text-default”
xlinkHref=”/resource/SLDS/assets/icons/standard-sprite/svg/symbols.svg#account”
/></th>
<th data-label=”acc-name” role=”row”>
<a href=”#” class=”slds-truncate”>{!acc.Name}</a></th>
<td data-label=”industry”>
<a href=”#” class=”slds-truncate”>{!acc.Industry}</a></td>
<td data-label=”industry”>
<a href=”#” class=”slds-truncate”>{!acc.Phone}</a></td>
</tr>
</aura:iteration></tbody>
</table>
</aura:component>[/sourcecode]

The controller of the component calls an aura method and sets the accountlist attribute which is being used to show the accounts.

AccountListComponentController.js

[sourcecode language=”java”]
({
getAccountlst : function(component, event, helper) {

var action = component.get(“c.getAccountlist”);

action.setCallback(this, function(a) {
if (a.getState() === “SUCCESS”) {
component.set(“v.accountlist”, a.getReturnValue());
} else if (a.getState() === “ERROR”) {
$A.log(“Errors”, a.getError());
}
});

$A.enqueueAction(action);
}
})
[/sourcecode]

This is a very basic component which only shows the last 10 created accounts.Lets create a header component.

AccountListHeader.cmp

[sourcecode language=”java”]
<aura:component >
<div class=”slds-page-header” role=”banner”>
<div class=”slds-grid”>
<div class=”slds-col slds-has-flexi-truncate”>
<h1 class=”slds-text-heading–medium slds-truncate” title=”All Accounts”>Accounts</h1>
</div>
<div class=”slds-col slds-no-flex slds-align-bottom”>
<div class=”slds-button-group”>
<button class=”slds-button slds-button–neutral” onclick=”{!c.showModal}”>Add Account</button>
</div>
</div>
</div>
<p class=”slds-text-body–small slds-m-top–x-small”>10 items, ordered by recently created</p>

</div>
</aura:component>
[/sourcecode]

The controller of component is used for the new Account button which is adding a style to the modal dialog box(explained below).

AccountListHeaderController.js

[sourcecode language=”java”]
({
showModal : function(component, event, helper) {
document.getElementById(“backGroundSectionId”).style.display = “block”;
document.getElementById(“newAccountSectionId”).style.display = “block”;
}
})
[/sourcecode]

 The next step is to create the modal dialog lightning component.By default I have added a style(diplay :none;) to the div so that it's hidden by default.On the click of new Account button it calls a javascript button which changes the style of the div.
AccountCreateComponent.cmp

[sourcecode language=”java”]
<aura:component controller=”AccountListController”>
<aura:attribute name=”newAccount” type=”Account”
default=”{ ‘sobjectType’: ‘Account’,
‘Name’: ”,
‘Industry’: ”,
‘Phone’: ”
}”/>
<div aria-hidden=”false” id=”newAccountSectionId” role=”dialog” class=”slds-modal slds-modal–large slds-fade-in-open” style=”display:none;”>
<div class=”slds-modal__container”>
<div class=”slds-modal__header”>
<h2 class=”slds-text-heading–medium”>New Account</h2>
<button class=”slds-button slds-button–icon-inverse slds-modal__close” onclick=”{!c.showModalBox}”>
<c:svg class=”slds-button__icon slds-button__icon–large”
xlinkHref=”/resource/SLDS/assets/icons/action-sprite/svg/symbols.svg#close”
ariaHidden=”true”
/>
<span class=”slds-assistive-text”>Close</span>
</button>
</div>
<div class=”slds-modal__content”>
<div>
<div class=”slds-form-element”>
<div class=”slds-form-element__control”>
<ui:inputText aura:id=”accname” label=”Account Name”
class=”slds-input”
labelClass=”slds-form-element__label”
value=”{!v.newAccount.Name}”
required=”true”/>
</div>
</div>
<div class=”slds-form-element”>
<div class=”slds-form-element__control”>
<ui:inputText aura:id=”accname” label=”Industry”
class=”slds-input”
labelClass=”slds-form-element__label”
value=”{!v.newAccount.Industry}”
required=”true”/>
</div>
</div>
<div class=”slds-form-element”>
<div class=”slds-form-element__control”>
<ui:inputText aura:id=”accname” label=”Phone”
class=”slds-input”
labelClass=”slds-form-element__label”
value=”{!v.newAccount.Phone}”
required=”true”/>
</div>
</div>
</div>
</div>
<div class=”slds-modal__footer”>
<div class=”slds-x-small-buttons–horizontal”>
<button class=”slds-button slds-button–neutral” onclick=”{!c.showModalBox}” >Cancel</button>
<button class=”slds-button slds-button–neutral slds-button–brand” onclick=”{!c.saveAccount}”>Save</button>
</div>
</div>
</div>
</div>
<div class=”slds-backdrop slds-backdrop–open” id=”backGroundSectionId” style=”display:none;”></div>
</aura:component>[/sourcecode]

The controller of the component consists of two methods.One calls an aura method
to save the new account record.The other to hide the modal dialog by update the display style attribute.

AccountCreateComponentController.js

[sourcecode language=”java”]
({
showModalBox : function(component, event, helper) {
document.getElementById(“backGroundSectionId”).style.display = “none”;
document.getElementById(“newAccountSectionId”).style.display = “none”;
},

saveAccount : function(component, event, helper) {

var action = component.get(“c.getAccountupdatedlist”);
action.setParams({ “newAcc” : component.get(“v.newAccount”)});

action.setCallback(this, function(a) {
if (a.getState() === “SUCCESS”) {
document.getElementById(“backGroundSectionId”).style.display = “none”;
document.getElementById(“newAccountSectionId”).style.display = “none”;
} else if (a.getState() === “ERROR”) {
$A.log(“Errors”, a.getError());
}
});

$A.enqueueAction(action);
}
})
[/sourcecode]

Almost there, the last step is to combine all these 3 components 🙂

AccountListApp.app

[sourcecode language=”java”]
<aura:application >
<c:AccountListHeader />
<c:AccountCreateComponent />
<c:AccountListComponent />
</aura:application>
[/sourcecode]

Lightning componentLightningdesignsystemsModal DialogPopup
52
Like this post
2 Posts
Nitish

Search Posts

Archives

Categories

Recent posts

SUMMER’21 HIGHLIGHTS: TABLEAU CRM

Is Kanban really helpful in Project Management?

Is Kanban really helpful in Project Management?

Smarter and efficient way of selecting a candidate with Compare Applicant

Smarter and efficient way of selecting a candidate with Compare Applicant

Tableau CRM: Add action buttons on Table without XMD

Tableau CRM: Add action buttons on Table without XMD

jQuery DataTable in Salesforce Lightning Component

jQuery DataTable in Salesforce Lightning Component

  • Next PostWhat is files connect ? And why should we care about it ?

Related Posts

Is Kanban really helpful in Project Management?
AppExchange ConnectEazy HRMS Salesforce

Is Kanban really helpful in Project Management?

Smarter and efficient way of selecting a candidate with Compare Applicant
AppExchange ConnectEazy Salesforce

Smarter and efficient way of selecting a candidate with Compare Applicant

Tableau CRM: Add action buttons on Table without XMD
Salesforce Salesforce Einstein Tableau

Tableau CRM: Add action buttons on Table without XMD

jQuery DataTable in Salesforce Lightning Component
Jquery Lightning Salesforce

jQuery DataTable in Salesforce Lightning Component

11 Comments

  1. Creating a Modal Dialog box using Lightning Design System – Lightning Component | SutoCom Solutions
    Reply
    25 February 2016
    Reply
  2. CRUD in Lightning – ForceOlympus
    Reply
    30 March 2016
    Reply
  3. Gaurav
    Reply
    29 June 2016

    I am getting error while saving controller..the error message is

    ‘expecting a left angle bracket, found ‘&’
    at this line…
    public static list &lt; Account &gt; getAccountlist() {

    ….also a.getState() return string value but it is mentioned as &quot;SUCCESS&quot;
    is this correct also we call method of controller in lightning component by

    var action = component.get(“c.getAccountList”); but here it is mentioed as…
    var action = component.get(&quot;c.getAccountlist&quot;);

    Is this correct??

    Reply
    • Nitish
      Reply
      5 July 2016

      Hi Gaurav,

      There was some formatting issue in the code. I have updated it and should be working fine now.

      Reply
  4. reddy
    Reply
    11 July 2016

    Can you please put App in visualforce page

    Reply
    • Nitish
      Reply
      11 July 2016

      You can not add App directly to Visualforce page ..But you can follow this article to add all the components inside a visualforce page https://developer.salesforce.com/docs/atlas.en-us.lightning.meta/lightning/components_visualforce.htm

      Reply
  5. mayukh
    Reply
    10 August 2016

    Hi Nitish. Good Blog.
    I implement the same functionality in my Org, but I want to rerender newly created account on parent Component Page(AccountListComponent) on save of the Account in modal window.

    Reply
    • Nitish
      Reply
      10 August 2016

      Hi Mayukh,
      Thanks for the positive feedback.
      For showing the new account on the parent component page change the saveAccount method to return the newly created accounts and then set the accountlist attribute. That will show the newly created account.

      Reply
  6. Sahana
    Reply
    18 October 2016

    Can I show visualforce page instead of account list??

    Reply
    • Nitish
      Reply
      18 October 2016

      You can add a visualforce page inside a lightning component using iframe tag. Not a very good practice though. Better to get your visualforce page to lightning component

      Reply
  7. ABSYZ – Top 5 Blogs – ForceOlympus
    Reply
    12 September 2017
    Reply

Leave a Reply (Cancel reply)

Your email address will not be published. Required fields are marked *

*
*

ABSYZ Logo
  • Home
  • About us
  • Article & Blogs
  • Careers
  • Get In Touch
  • Our Expertise
  • Our Approach
  • Products
  • Industries
  • Clients
  • White Papers

ABSYZ Software Consulting Pvt. Ltd.
USA: 49197 Wixom Tech Dr, Wixom, MI 48393, USA
M: +1.415.364.8055

India: 6th Floor, SS Techpark, PSR Prime, DLF Cyber City, Gachibowli, Hyderabad, Telangana – 500032
M: +91 79979 66174

Copyright ©2020 Absyz Inc. All Rights Reserved.

youngsoft
Copy