ABSYZ ABSYZ

  • Home

    Home

  • About us

    Who We Are

  • Our Expertise

    What we Do

  • Our Approach

    How We Do It

  • Products

    What We Made

  • Industries

    Who We Do It For

  • Clients

    Whom We Did It For.

  • Article & Blogs

    What Experts Think

  • Careers

    Join The Team

  • Get In Touch

    Let’s Get Started

ABSYZ

How to Export data from salesforce using Talend

Home / Article & Blogs / Salesforce / Integration / How to Export data from salesforce using Talend
By Team ABSYZ inIntegration

Transferring data to and from Salesforce is not very difficult. Salesforce data import wizard and Salesforce Dataloader.io tools made the job of data migration a rather point-and-click process. However for repetitive, complex, or large scale data transfer operations, these tools become too difficult.

Talend is one such tool with a great portfolio of data integration and migration offerings that can be used to migrate data to and from Salesforce. The free data migration tool Talend Open Studio, is even popular among our Salesforce developers.

What is Talend?

Talend is an open source data integration platform. It provides various software and services for data integration, data management, enterprise application integration, data quality, cloud storage and Big Data. Using Talend, data becomes more accessible, its quality enhances and it can be moved quickly to the target systems.

Please find below link for the installation and introduction about talend.

https://teamforcesite.wordpress.com/2018/10/16/introduction-to-talend-integration-tool/

Steps to  Export data from salesforce in Talend

Step 1: Open Talend and Create a Job

The first step is to open Talend and create a new project. You can create a local project with default credentials or you can access a cloud hosted project through proper login and password.

screenshot 1

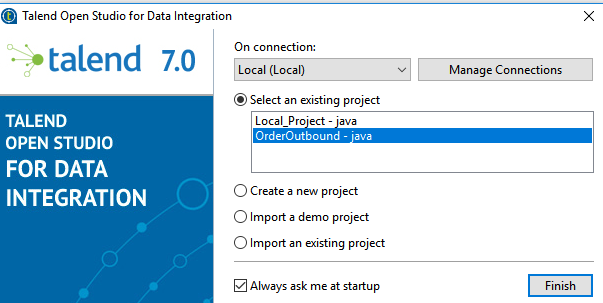
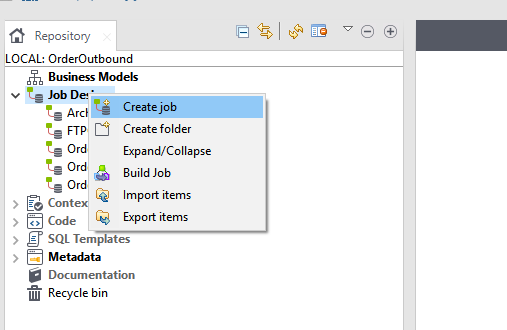
Once you have opened a new project, the first step is to create a new job. In the left side panel labeled Repository, you will find an entry named Job Design. Right click on it and create new Job.

screenshot2

Step 2: Establishing Connections for Export

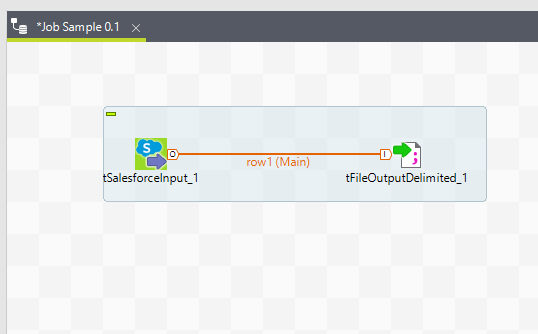
1.Once you have created your Job, you can drag and drop the connection to the Job Designer panel. Drag  tSalesforceInput component to extract the data from salesforce . This component can be found in the  Palette.

2.Connect the tSalesforceInput component to the tfileOutputDelimited component which outputs data to a delimited file using a Row > Main connection.

screenshot 3

Step 3:Configuring the Components

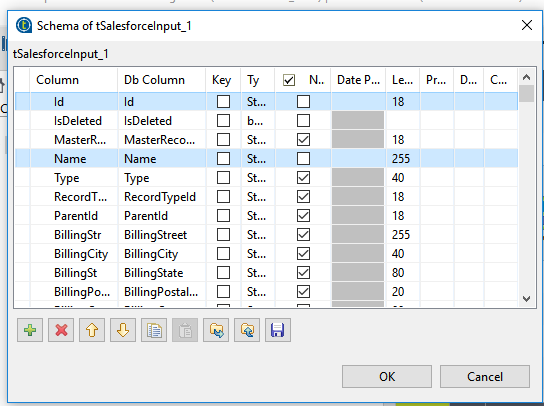
1.Double-click the tSalesforceInput component to open its Basic settings view.

screenshot9

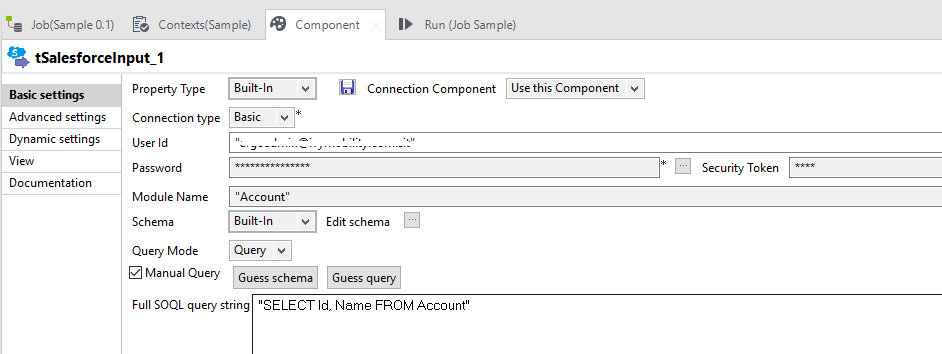
2.In the User Id, Password and Security Key fields, enter the user authentication information required to access Salesforce.

3.Click the […] button next to the Module Name field and in the pop-up dialog box, select the object you want to access. In this example, it is Account.

4.Click the […] button next to Edit schema to open the schema dialog box.

5.Remove all columns except Id, Name.

Note that to retrieve a column from a linked object, it is necessary to define the name of the column in a particular manner in the schema editor.

Click OK to save the changes and close the schema dialog box.

screenshot 5

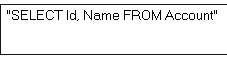
6.Select the Manual Query check box and in the Full SOQL query string field displayed, enter your SOQL statement used to search the data to be retrieved. In this example, the statement is as follows:

 screenshot 6

7.Double-click the tfileOutputDelimited component to open its Basic settings view.

screenshot10

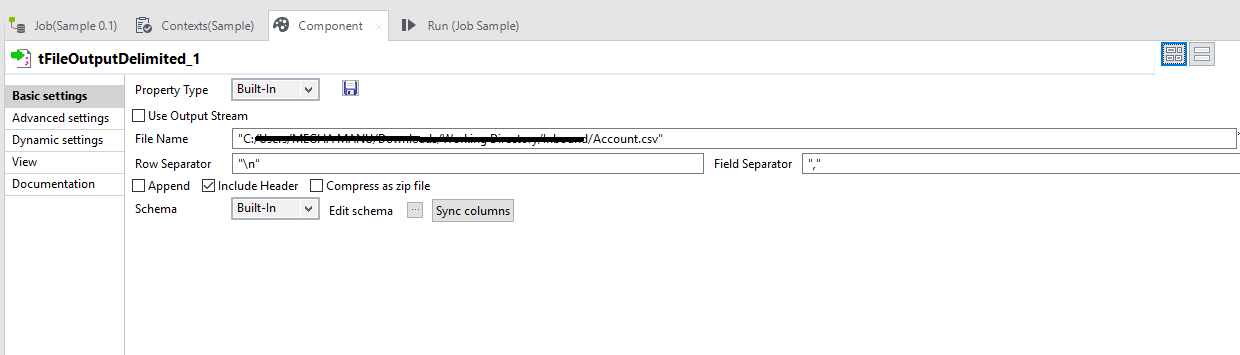
8.In the Property Type field, set the type to Built-in and fill in the fields that follow manually.

9.Click the […] button next to the File Name field and browse to the output file you want to write data in, Account.csv  in this example(extension can be .txt,.xsls  etc).

10.In the Row Separator and Field Separator fields, set “\n” and “,” respectively as row and field separators.

11.Select the Include Header check box if you want to output columns headers as well.

12.Click Edit schema to open the schema dialog box and verify if the recuperated schema corresponds to the input schema. If not, click Sync Columns to recuperate the schema from the preceding component.

13.Press Ctrl+S to save your Job.

14.Press F6 or click Run on the Run tab to execute the Job.

screenshot 8

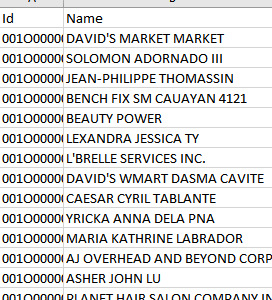
The two specified columns Id, Name are output in the defined output file.

Note: There is no built-in limit to the number of records you can output with a tFileOutputDelimited. Once you get into really HUGE (1B+) numbers of records, you do need to start considering resources on the server and may find that your particular job and hardware configuration imposes a limit on the number of records you can process ( disk space, memory, etc… )


Integration with Salesforce
99
Like this post
127 Posts
Team ABSYZ

Search Posts

Archives

Categories

Recent posts

All About The OmniStudio FlexCards

All About The OmniStudio FlexCards

Boost Customer Experience With Repeater Widget in CRM Analytics

Boost Customer Experience With Repeater Widget in CRM Analytics

Enhance Insights Using Custom Tooltips In CRM Analytics

Enhance Insights Using Custom Tooltips In CRM Analytics

Net zero as a Service In CPG Industry

Net zero as a Service In CPG Industry

How Do We Import an External Library into Salesforce Lightning?

How Do We Import an External Library into Salesforce Lightning?

  • Previous PostIntroduction To Talend Integration Tool
  • Next PostSalesforce Integration with WordPress

Related Posts

PLATFORM EVENTS IN SALESFORCE
Integration Salesforce

PLATFORM EVENTS IN SALESFORCE

Integrate SharePoint with Salesforce using Microsoft Graph API
Apex Integration Salesforce

Integrate SharePoint with Salesforce using Microsoft Graph API

Create/Update Salesforce Picklist definitions using metadata API
Integration Metadata API Salesforce

Create/Update Salesforce Picklist definitions using metadata API

Increase your Productivity with the Apex Metadata API
Integration Metadata API

Increase your Productivity with the Apex Metadata API

1 Comment

  1. How to use external Id to Upsert data in salesforce using Talend – ABSYZ
    Reply
    4 January 2019
    Reply

Leave a Reply (Cancel reply)

Your email address will not be published. Required fields are marked *

*
*

ABSYZ Logo

INDIA | USA | UAE

  • About us
  • Article & Blogs
  • Careers
  • Get In Touch
  • Our Expertise
  • Our Approach
  • Products
  • Industries
  • Clients
  • White Papers

Copyright ©2022 Absyz Inc. All Rights Reserved.

youngsoft
Copy
We use cookies on our website to give you the most relevant experience by remembering your preferences and repeat visits. By clicking “ACCEPT ALL”, you consent to the use of ALL the cookies. However, you may visit "Cookie Settings" to provide a controlled consent. Privacy Policy
Cookie SettingsREJECT ALLACCEPT ALL
Manage consent

Privacy Overview

This website uses cookies to improve your experience while you navigate through the website. Out of these, the cookies that are categorized as necessary are stored on your browser as they are essential for the working of basic functionalities of the website. We also use third-party cookies that help us analyze and understand how you use this website. These cookies will be stored in your browser only with your consent. You also have the option to opt-out of these cookies. But opting out of some of these cookies may affect your browsing experience.
Necessary
Always Enabled

Necessary cookies are absolutely essential for the website to function properly. These cookies ensure basic functionalities and security features of the website, anonymously.

CookieDurationDescription
cookielawinfo-checkbox-analytics11 monthsThis cookie is set by GDPR Cookie Consent plugin. The cookie is used to store the user consent for the cookies in the category "Analytics".
cookielawinfo-checkbox-functional11 monthsThe cookie is set by GDPR cookie consent to record the user consent for the cookies in the category "Functional".
cookielawinfo-checkbox-necessary11 monthsThis cookie is set by GDPR Cookie Consent plugin. The cookies is used to store the user consent for the cookies in the category "Necessary".
cookielawinfo-checkbox-others11 monthsThis cookie is set by GDPR Cookie Consent plugin. The cookie is used to store the user consent for the cookies in the category "Other.
cookielawinfo-checkbox-performance11 monthsThis cookie is set by GDPR Cookie Consent plugin. The cookie is used to store the user consent for the cookies in the category "Performance".
viewed_cookie_policy11 monthsThe cookie is set by the GDPR Cookie Consent plugin and is used to store whether or not user has consented to the use of cookies. It does not store any personal data.

Functional

Functional cookies help to perform certain functionalities like sharing the content of the website on social media platforms, collect feedbacks, and other third-party features.

Performance

Performance cookies are used to understand and analyze the key performance indexes of the website which helps in delivering a better user experience for the visitors.

Analytics

Analytical cookies are used to understand how visitors interact with the website. These cookies help provide information on metrics the number of visitors, bounce rate, traffic source, etc.

Advertisement

Advertisement cookies are used to provide visitors with relevant ads and marketing campaigns. These cookies track visitors across websites and collect information to provide customized ads.

Others

Other uncategorized cookies are those that are being analyzed and have not been classified into a category as yet.

SAVE & ACCEPT