
Heroku, a Salesforce company, provides developers with a faster and more effective way to create, deploy, and manage apps in the cloud. If you are a salesforce developer alone and you want to work on Heroku with language Java ,this blog guides you well. In this blog we will go through the files to be used for deploying a Java Application.
The requirement of files can be divided into two categories:
1.Files Specific to Java.
2.Files Specific to Heroku.
Files Specific to Java:
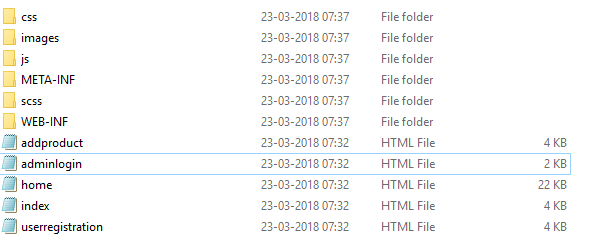
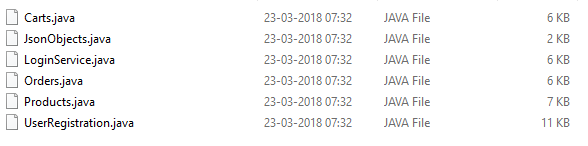
When it comes to Java, basic Java web application uses languages like HTML,CSS,JavaScript and Java. HTML and CSS is used for front end development and Java is used at the backend in the server to process the data and return the required output. A connection between these two is done by JavaScript.HTML pages,CSS, JavaScript can be placed in a single folder naming it as Web Content. In that folder, CSS and JavaScript can be placed in two separate sub folders and if you are going to refer any image in HTML ,those can also be placed in a new sub folder. Also make sure WEB-INF file is present in the same folder. The significance of this is ,it contains the alias names and paths where the Java classes are present. The Java classes will be placed in ‘src/main’ folder. Main is the sub folder of src. There will be two basic Java classes, Servlets which are used to connect to database and also to connect to specific Java class based on the request from JavaScript, the other one is the actual class which contains business logic .These two types are placed in two different sub folders of main folder.In my application flow, whenever an action is performed on HTML page it is captured by Java script and it fires the request to servlet which redirects it to specific class that contains respective business logic.
Files Specific to Heroku:
Considering heroku specific files, POM.XML file and Procfile ,these two are mandatory to run the application on heroku server. Readme.md and App.json files are used to increase flexibility over deploying application to heroku and which makes them not mandatory. We will go through each of them in detail.
POM.XML file:
1. POM is an acronym of Project Object Model
2. It contains information of project and configuration information for the maven to build the project such as dependencies, build directory, source directory, test source directory, plugin, goals etc.
3. Maven reads the pom.xml file, then executes the goal.
4. Basic attributes used in designing POM file
project
ModelVersion
GroupId
ArtifactId
This POM file can also be autogenerated in an Java IDE like Eclipse.
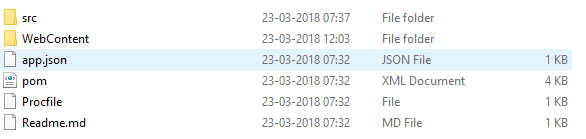
Folder structure for a Java application to be deployed on heroku

Significance of POM :
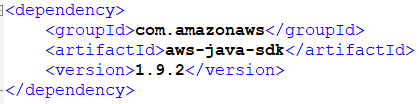
For suppose you are using any external libraries in the Java class like ‘import com.amazonaws.auth.AWSCredentials;’ ,Heroku server will not know from where to import unless you mention it in POM file like:
You should also give a name for destination file ,where these downloaded libraries to be stored. This name will be used in Procfile creation syntax. In case of automatically created POM file name will be given based on the project folder name.
Procfile:
A Procfile is a mechanism for declaring what commands are to be run by your application’s dynos on the Heroku platform.
You can use a Procfile to declare various process types.
Syntax is : process type:command
The file must be placed in the root directory of your application. It will not function if placed in a subdirectory.
Significance of procfile:
Initially when the application is loaded in browser, the request hits a web dyno of that application, the response given by that web dyno is displayed on browser. But we need to specify to that web dyno which it needs to execute when it gets request, this is done in the Procfile. During compilation all the project files are compressed into war file and the libraries which are downloaded using POM file will be compressed into jar file,to which we can specify name as explained in POM section.
Example of Procfile:
web: Java $Java_OPTS -jar target/dependency/webapp-runner.jar –port $PORT target/*.war
*Java indicates it is a Java command, this is necessary because heroku is capable of running many languages .
*webapp-runner.jar is the file name which we gave in POM file to store libraries downloaded. Heroku keeps it in target/dependency.
*PORT is a environmental variable which will get value automatically by heroku during runtime. we no need to worry about that .
*All the compiled code will get stored in war files by heroku. target/*.war tells to run the war file.’*’ indicates run all the war files that heroku created.
App.Json :
1. Enables developers to define their applications’ details, setup configurations and runtime environments in a structured way.
2. This makes to easily deploy the source code into fully configured apps on Heroku, ready for further development.
3. For example you can specify the add-ons that are needed for your application, so that these will be provided as soon as the application is created, Considering the application is created using ‘deploy to heroku button’.
Readme.Md:
It is used to generate the html summary you see at the bottom of projects. You can mention a brief explanation of your App, Like how to configure it while deploying on heroku-the Add-Ons to be installed,the config vars that needs to be filled in in this application.
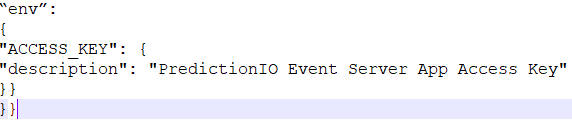
Heroku provides Application deployment with just one button click. The button is ideal for customers, open-source project maintainers or add-on providers who wish to provide their customers with a quick and easy way to deploy and configure a Heroku app. So as mentioned above either you can give brief explanation of what to do after deploying App or you can make them do that while deploying. This is possible by this heroku button together with App.json file. In the App.json file you need to mention what additional details you need to run this Application after deploying. For suppose you need Access key of AWS s3 ,you can mention it in APP.json file like
While deploying it will ask you the details and it is required to fill it, to continue further.
Once you have verifed the App.json file ,it’s time to add a button to your repository. The basic requirements for creating a button is that your app has a valid app.json file in its root directory, and that the app source code is hosted in a GitHub repository. In short you need to refer your source code repository in Readme file.
There are two ways to refer repository code, one way is refering directly if your button is residing on the github repo
[](https://heroku.com/deploy)
The other way is referring it explicitly ,if your button is residing outside of git repository, like in the blog post
[](https://heroku.com/deploy?template=https://github.com/heroku/node-js-sample))
You just need to append git repo url at the end. Thats it with one click your Application is deployed on heroku which means it is available online,so everyone can access it.
Application can also be deployed from local system using git commands.
Git init
Git add .
Git commit -m “firstcommit”
Git push heroku master
With these files you can deploy a fully configured Java web Application on heroku, without expertise knowledge on Java.
So now Deploying applications on Heroku is fun!!