The Service Cloud Lightning Snap-ins allows you to embed the support channel of your customer’s choice – chat, video chat, knowledge, case management and click-to-call – inside your company’s webpage or web app.
By adding the Snap-ins chat widget to your website, customers can quickly get answers to their questions by chatting with an agent while browsing your site. Snap-ins chat uses Live Agent, but with a simpler setup, to power your chats.
Capabilities of Service Cloud Lightning Snap-Ins :
Deliver faster service
Setting up a snap-in using our native mobile SDK or our web SDK, with our pre-dockable components, allow you to:
- Integrate knowledge articles into apps for an effortless customer experience.
- Customize images and chat colors to match your brand quickly and easily by embedding a small code snippet into your app.
Provide smarter in-context support
Provide service in context for customers, and build a smarter team.
- Deliver knowledge articles to customers based on what they’re looking at on your app, and what they want to do.
- Put customers in control with the ability to open a new case, view cases they’ve previously opened, and monitor the status of their current open cases, all on your app.
Personalize service delivery
Connect with customers one-to-one at their point of need by seeing their issues and guiding them through resolution.
- Engage directly with customers with SOS two-way video chat.
- Empower customers by giving them the ability to point to exactly what the problem is with their camera or flashlight.
- Pinpoint answers by drawing right in the app, so agents can direct customers to the exact information they need faster. Connected Deliver a seamless service experience by connecting the entire customer journey on one platform with a unified SDK.
- Customize the service experience for every page of your site by delivering support options based on customer needs and company goals.
Connect the customer journey
Connect the entire customer journey on one platform for a seamless and differentiated service experience. And customize the experience for brand consistency.Don’t make your customers call you. Bring service to them.
Set Up Snap-Ins Chat for Web
To set up snap-ins chat, your org must meet these prerequisites:
- Lightning Experience must be enabled to set up snap-ins
- Service Cloud License
- Live Agent License
- Live Agent must be enabled in your org
- A Live Agent chat button and a Live Agent deployment must be set up and available in your org
- A Salesforce Community or a Force.com site must be set up on your org and available for guest user access
1.Add Your Website to the CORS Whitelist
Add the URLs of the web pages where you intend to add the Snap-ins chat widget to the CORS whitelist in your org. The web page where you add the Snap-ins Chat is the page that customers use to access chat.
1.From Setup, enter CORS in the Quick Find box, then select CORS.
- Select New.
- Enter an origin URL pattern. The origin URL pattern must include the HTTP or HTTPS protocol and a domain name.
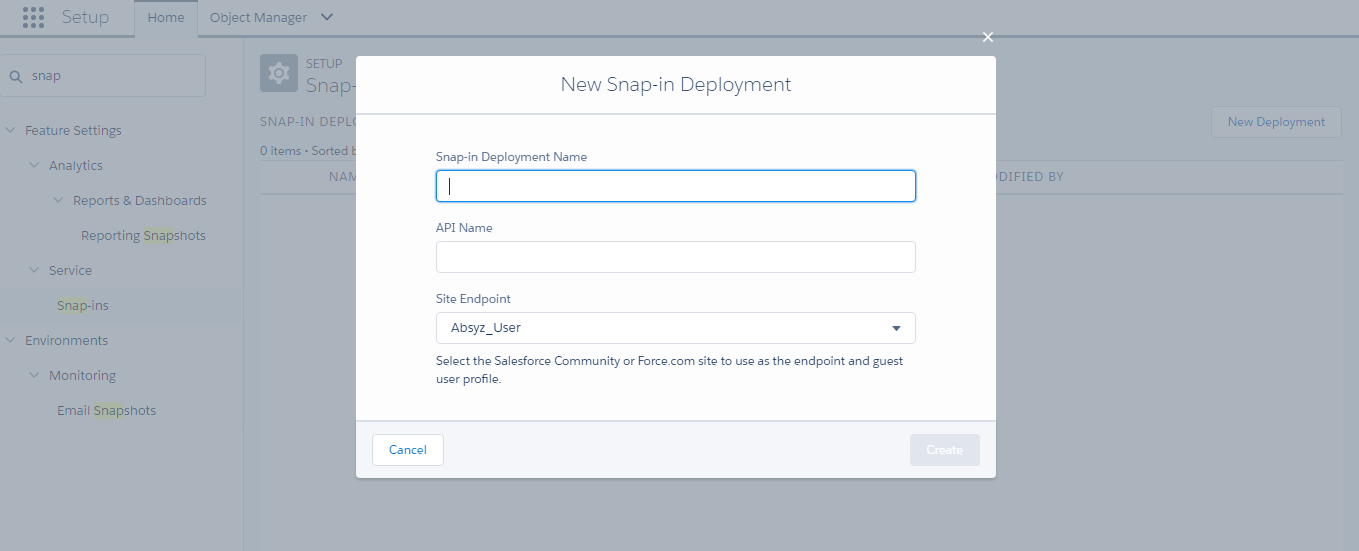
2. Create a Snap-ins Deployment
Create a Snap-in deployment for each Snap-in widget that you’re using. The setup node for Snap-ins chat is available only in Lightning Experience.The Snap-ins Chat setup uses a Salesforce Community or Force.com site, so that you can associate users with a guest user profile.
- From Setup, enter Snap-ins in the Quick Find box.
- In the Snap-ins configuration page, click New Deployment.
- Enter a name for your snap-in. The deployment name is shown in the list of snap-ins on the Snap-in page.
- In the Site Endpoint menu, select a Salesforce community or Force.com site from the dropdown list.
- Click Create.
3. Specify the Live Agent Settings for Your Snap-ins Chat Deployment
The Snap-ins chat widget uses a Live Agent deployment ID and button so customers can chat with your agents. The Live Agent details that you provide are used to generate the chat widget code that you add to your web pages. Before you specify the Live Agent settings, ensure that you have a Live Agent deployment and a Live Agent chat button available to use with the Snap-ins chat widget.
- Select the snap-in deployment that you want to work with by clicking the arrow beside the deployment name and selecting View.
- In the Snap-ins configuration page, go to the Live Agent Basic Settings section and click Start.
- In the Live Agent Deployment menu, select the Live Agent configuration that you want to use with snap-in chat from the dropdown list.
- In the Live Agent Button menu, select the Live Agent button that you want to use with the snap-in chat widget from the dropdown list and click Save.
4. Customize the Branding and Appearance of Your Snap-ins Chat Widget
Select the colors and font used in the Snap-ins chat widget to reflect your company’s brand identity
- Select the snap-in deployment that you want to work with.
- In the Snap-ins configuration page, go to the Branding section and click Edit.
- Select the colors that you want to show in the chat widget. Enter the color using the hex code and Click Done.
- Select the font that you want to use in the Snap-ins chat widget and Click Finish.

5. Customize the Pre-Chat Form
Gather contact information from your customers and find out about their needs using a pre-chat form
- Select the snap-in deployment that you want to work with.
- In the Snap-ins configuration page, make the Pre-chat page Active.
- Click Edit and Select the use case for the pre-chat form.
- Select the record type that’s created from the pre-chat form. The drop-down menu shows record types that are available on the object.
- Select the fields shown on the pre-chat form.
- To change the order of the fields, use the up arrow and down arrow.
- To add a field, click + and to remove a field, click X.
- To require customers to fill out a field, select Required next to the field.
- Click Save.
6. Customize Labels for Snap-ins Chat
You can customize most of the field labels for your Snap-ins from either Lightning Experience or Salesforce Classic
1. From Setup, enter Rename Tabs and Lables in the Quick Find box, then select
Rename Tabs and Labels.
2. Select the language for which you’d like to customize labels.
3. Click Edit next to Snap-ins.
4. If you want to change the tab name, enter the new name, then click Save.
5. Click Next.
6. Change the desired labels. The labels you change apply only to the selected language.
7. Click Save.
7. Copy the Snap-ins Chat Code Snippets and Paste the Code into Your Web Pages
Salesforce generates a unique code snippet based on the information you provided during the Snap-ins Chat setup. Copy and paste the chat code snippet so you can add the Snap-ins chat widget to your web pages. Copy and paste the optional meta tag code snippet to make your web pages responsive to different form factors such as mobile and desktop.
- From Setup, enter Snap-ins in the Quick Find box, then select Snap-ins.
- Select the snap-in deployment that you want to work with.
- In Snap-ins configuration page, go to Snap-in Code Snippets section and click Get Code.
- Copy the chat code snippet and paste it immediately above the closing </body> tag on your web page to add the Snap-ins chat widget to the page.Paste the chat code snippet into every web page where you want the chat widget to appear.
8. Customize the Snap-ins Chat Widget Code
Use a text or HTML editor to customize the optional parameters in the chat widget code snippet.
You can customize certain parameters that affect the appearance and behavior of the snap-ins chat
widget.
1. From Setup, enter Snap-ins in the Quick Find box, then select Snap-ins.
2. Select the snap-in deployment that you want to work with.
3. In the Snap-ins configuration page, go to the Snap-in Code Snippets section and
click Get Code.
4. Copy the chat code snippet to a text editor or HTML editor.
5. In the text editor or HTML editor, specify the image URLs for the chat widget parameters.
6. Save your changes.
After modifying the chat code snippet, add the code to every web page where you want the Snap-ins
chat widget to appear.
9. Test the Snap-ins Chat Experience
Now that you’ve add Snap-ins Chat in your web pages, it’s time to test it out.
To test the snap-in chat from the agent’s perspective, log in to Salesforce as a Live Agent user with
all the Live Agent support agent permissions.
1. Log in to Service Cloud and go online as the agent assigned to the appropriate button.
2. Test the chat from the customer’s perspective. In another window in the same browser, initiate
a chat by navigating to a web page where you’ve placed the code snippet and starting the
chat.
The chat should be available.
3. On the customer side (that is, on your web page), verify that:
• Pre-chat form looks how you expected
• Chat window looks how you expected
4. On the agent side (that is, in the Salesforce Console for Service), verify that:
• You receive a chat request when the chat is initiated
Snap-ins Chat Test the Snap-ins Chat Experience
If the chat widget and experience appears as you expected, your customers can start using embedded chat to communicate with your
agents