
Hello!! If you’re reading this, at the end you’ll have a very clear idea on how to build an Salesforce powered mobile app with React Native. Excited enough? Let’s get Started!! Giving your users the ease of access to data, and delivering the best UX is the best you can do for your business. Going “mobile” by allowing your users to access enterprise level data, from anywhere and to make business transactions over few clicks is another value based addition. With React Native + Salesforce, it is possible to develop a customised application designed to meet your business needs. Accessing your salesforce instance data over a customised UI & functionality is made achievable. For accessing Salesforce instance data we will be using the Salesforce mobile SDK, and use React Native in order to build a custom designed mobile application. Confused?? Let us quickly see what is a SDK and react native?
What is React Native??
React Native is a open source framework, which is used for developing cross platform mobile applications. The framework is created & maintained by Facebook, allowing developers to develop apps using “React JS” along with native platform capabilities.
What is a SDK?
An SDK is a collection of software used for developing applications for a specific device or operating system. Salesforce allows you to build your own custom App using Salesforce SDK. Thus, by allowing end users to access data from your org using REST API’s through a Connected App in your org. You can develop your custom app and distribute it through mobile industry channels, such as the Apple App Store or Google Play (Mobile SDK only).
Advantages of using Salesforce SDK:
- You can configure offline and control complex offline behavior(such as saving of a record data, when there is no internet access).
- Use push notifications to notify user about changes/transactions.
Mobile SDK integrates Lightning Platform Cloud Architecture into mobile apps by providing:
- Implementation of Salesforce Connected App policy.
- Salesforce org login and OAuth credentials management, including persistence and refresh capabilities.
- Secure offline storage with SmartStore.
- Syncing between the Salesforce cloud and SmartStore through SmartSync Data Framework.
- Support for Salesforce Communities.
- Wrappers for Salesforce REST APIs with implicit networking.
- Fast switching between users.
Let’s dive in and do some hand’s on!! Firstly, install the React-Native CLI. Once, you are done installing with the CLI, install the Salesforce Mobile SDK. Install cocoapods, in your CLI type sudo gem install cocoapods. You can install the Salesforce mobile SDK either by using npm(node package manager), or using git commands directly from your CLI. Installing of the SDK needs certain pre-requisite packages and tools, as in this case we are building our app using react native, we need to install forcereact package. Similarly, if you are planning to develop an native app for android/ios you can use the forceios & forcedroid packages alternatively. After your SDK environment is setup completely, make sure your React-Native CLI is setup correctly. Open your cli and type: forcereact create This will take you through steps to create a react native application, which uses Salesforce as a backend service provider, using the Salesforce Mobile SDK. 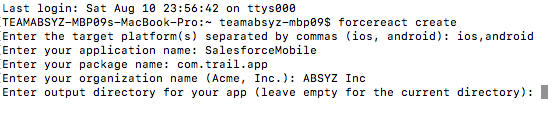 Enter a name for your application, the targeted platforms(i.e ios, android) as our application is react-native that would efficiently work on both the platforms. Enter a package name, your organization name(com.mycompany.app), finally choose the directory you want your app to be created. For default directory, leave it blank and press enter/return. On pressing return/enter, the forcereact package starts creating the application.
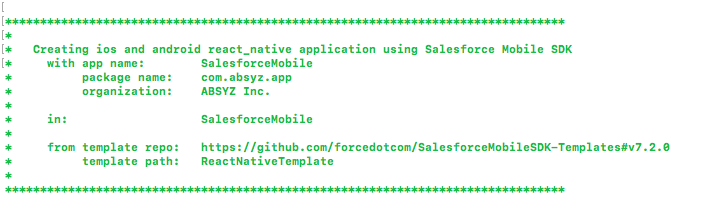
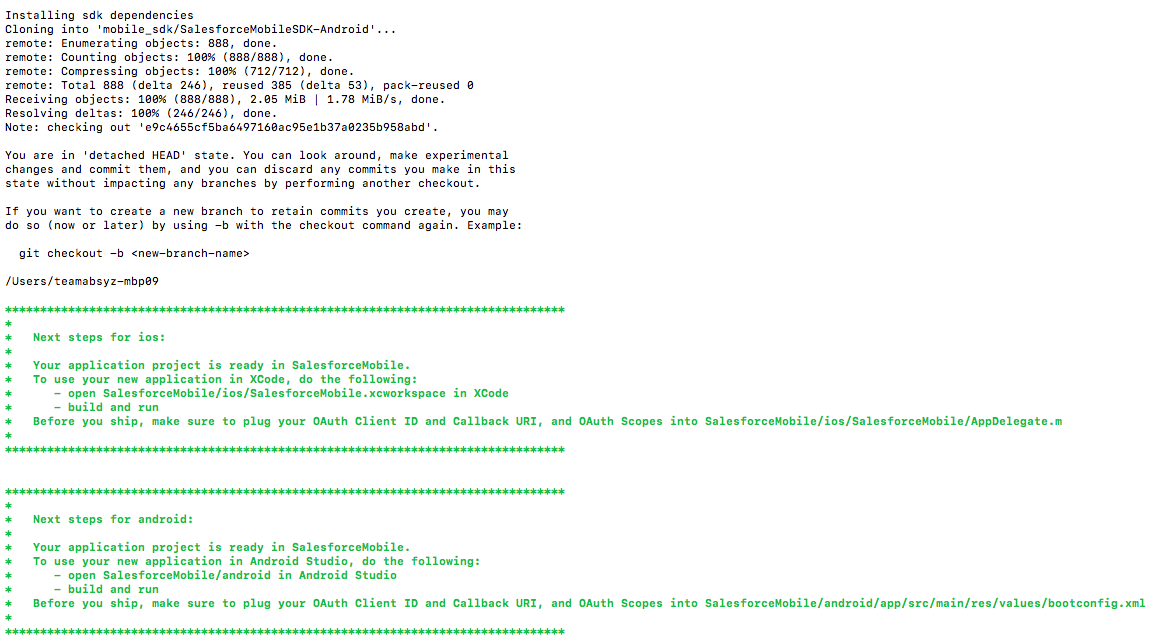 Once, your application is created you will see the successive steps displayed in your CLI. Before you run your application, open the “SalesforceMobile.xcworkspace” file, in your case it would be “yourappname.xcworkspace” file present inside the ios folder of your application, and add the RemoteAccessConsumerKey & OAuthRedirectURI. The RemoteAccessConsumerKey & OAuthRedirectURI can be generated by building a connected app in your salesforce org. The connected app, uses OAuth 2.0, in order to provide authorization to your salesforce org. This would include generating AccessToken, RefreshToken, Client ID for accessing data present in your org. through REST API’s. As of now, we use a sample RemoteAccessConsumerKey & OAuthRedirectURI key for accessing Contacts Data present in our Salesforce org. Paste the following in yourappname.xcworkspace file : // Fill these in when creating a new Connected Application on Lightning Platform static NSString * const RemoteAccessConsumerKey = @”3MVG***********”; static NSString * const OAuthRedirectURI = @”testsfdc:///mobilesdk/detect/oauth/done”; After pasting in the keys, save the file. For IOS: If you have XCode, for ios run the application in a simulator. In case you don’t have XCode open your CLI and type: react-native run-ios –simulator=”iPhone 6″ Once your application build, is successful, the build will be generated on the simulator device.
  For Android: If you have android-studio, open your application directory and then open the android directory. In the Project view, open the app/res/values/bootconfig.xml file. And replace the remoteAccessConsumerKey and oauthRedirectURI values with the sample values/your own settings. After pasting the values, you can run the application on an Android simulator using android studio, or you can run it via CLI on your device using: react-native run-android Your React Native app, when it’s built, creates a bundle that contains your custom JavaScript components. To run the app with the JavaScript and native code talking to each other, start up the React Native development server.
- In a Terminal window in MacOS or the command prompt in Windows, change to your app’s root directory. In our case, that’s SalesforceMobile.
- Run one of the following commands:
- In Mac OS: npm start
- In Windows: npm run-script start-windows
Once, the app build is successful you will see the login page to access your org data, the point is you are doing through a “Custom Mobile App”!!! Exciting enough?
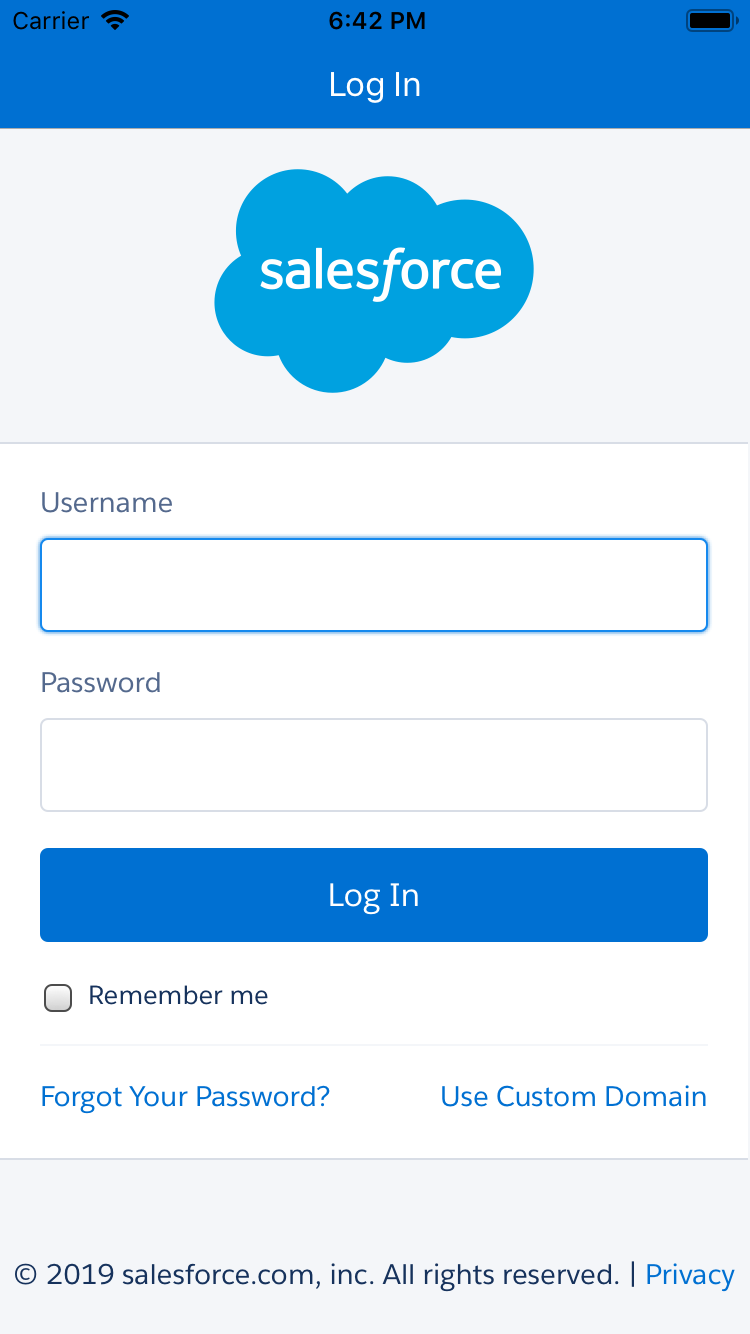
Enter your Developer org credentials, and sign in. Once you click on login, you’ll be navigated to the Allow Access Authorization page:
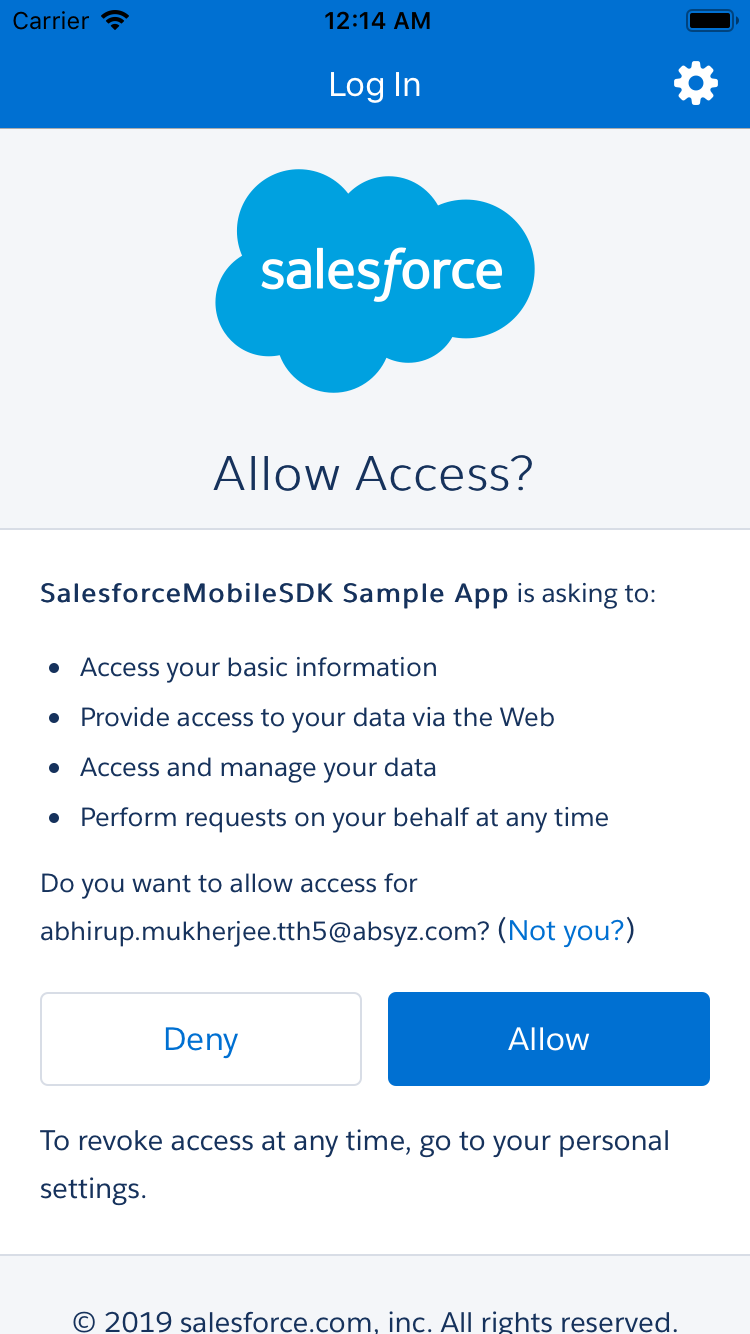
Once you click on ‘Allow‘ you’ll be navigated to the home screen, where you’ll be able to see your org data. In this case, we are just displaying a list of contacts from the Salesforce org.
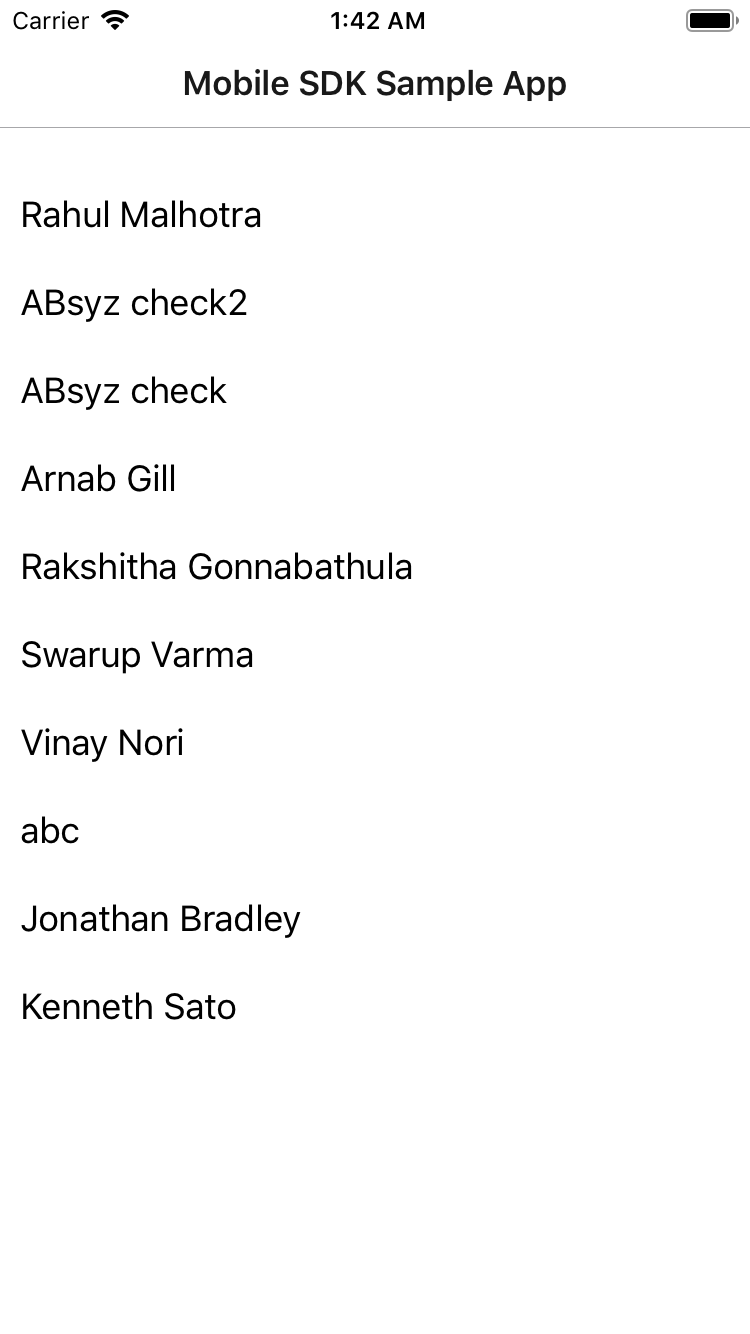
Fig: Showing list of contacts Data from Salesforce Org.
Also, if you want to change the login environment to Production/Sandbox by clicking on the settings icon present on the top right header bar, you can select your login environment.
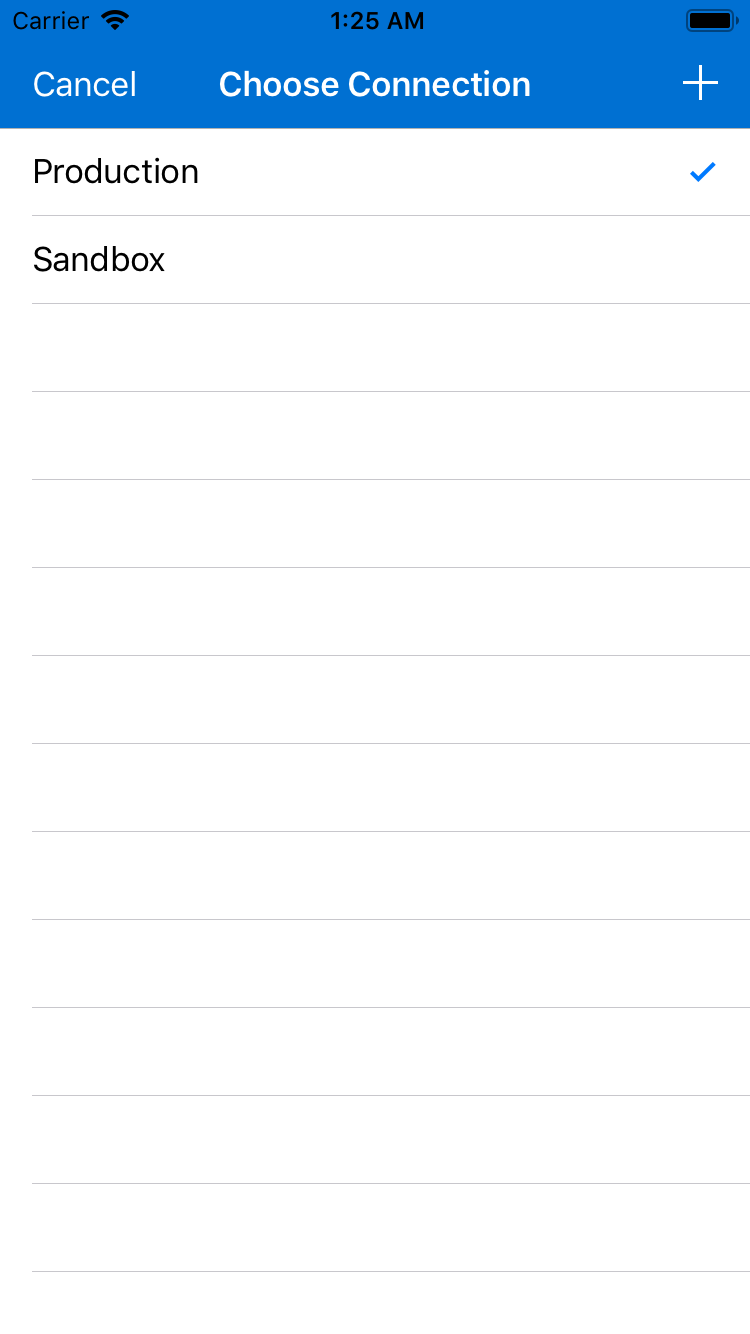
Fig: Showing changing ability of login environment.
Customizing your app, is the second most essential part and important for providing a better user experience. Based on your end user’s requirement you can customize your app accordingly. Which Data your users can view or have access to, can be all setup in the “Connected App” in your org. From setting up the callback url, Identity Access Management(IAM), to accessing data via access token, refresh token, everything can be configured accordingly in the “Connected App!!”. In the next series of blog, we dive straight into setting up the connected app for your org. highlighting key points, and also develop design a customized UI App. Stay tuned…. and happy reading!!