Conga Composer helps create and deliver documents from Salesforce by automatically populating the templates with data from any standard or custom object using merge fields. On the other hand, DocuSign is an eSignature solution that integrates with Salesforce. DocuSign delivers Conga Composer documents via email with the ability to acquire, track and file signatures using automatic anchor text and tags. Thus, if you can integrate DocuSign and Conga Composer, the Conga Composer would help gather information from any object in Salesforce and the DocuSign would allow the recipients to input data into the document. Does n’t that sound cool?!
How will it be if we can have Conga – DocuSign integration bound to the outbound message feature in Salesforce? Let us see – how to do it and how it works.
Step 1:
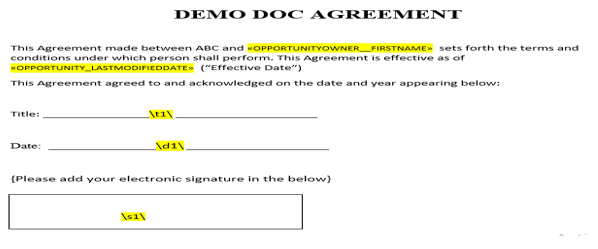
First, create the Conga Composer template with all the necessary merge fields to pull data from the related Salesforce record. Also, we can enter automatic anchor text like s1,t1,d1 etc. to enable the recipient to input data into the document. For example, use s1 where you want the tag information for the first signer to appear; Use s2 where you want the second signer to sign and so on.
Note: Colour the tag information white so it does not appear in the document.
Custom tags can also be related to Salesforce, which gives users the ability to push data from a DocuSign Envelope back into specific Salesforce fields.
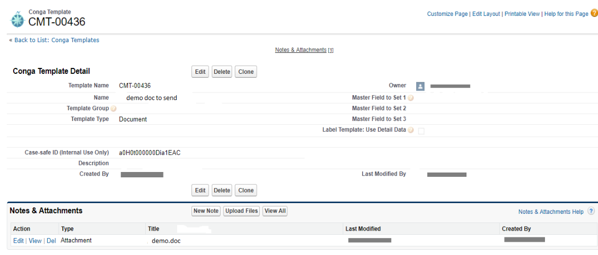
Step 2: Store the document as a new Conga Template record to make it available for merging
Step 3:
The next and significant factor in this process is the formula field we send in the outbound message.
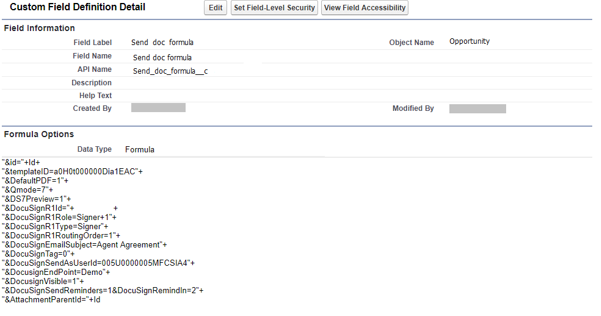
The formula field, as you can see, can hold a number of DocuSign integration parameters depending on our requirement.
&Template ID= The template ID of the document you uploaded in Step 2.
&DocuSignVisible=1 Changes the Action picklist in the Composer dialogue box to DocuSign.
&DocuSignR1Id= The record ID of a Salesforce Contact, Lead, or User to whom the document has to be send. This can be done with Salesforce fields, typically a lookup or formula field, with Contact Roles, or with more advanced options.
&DocuSignR1Type= Sets the recipient type. For e.g.: the type signer indicates that the recipient must sign, initial, date, or add data to tags on the documents in the envelope.
&DocuSignR1Role= Sets the role of the specified recipient as defined in Envelope Settings
&DocuSignR1RoutingOrder= Sets the order in which the message will be routed to recipients when multiple recipients exist.
&DocuSignSendAsUserId= Specifies a user if from which DocuSign envelopes are sent. Make sure this is the id of the user populated in the lookup field ‘User to send as’ in the outbound message
&DocusignEndPoint= Configures the Composer to connect to a specific DocuSign endpoint other than the DocuSign production endpoint. By default this will be set to prod.
&DS7=7 or 17 Runs in background mode and automatically sends the document.
You may refer this link for the DocuSign Integration Parameters:
Step 4: Next, let us set up the workflow rule.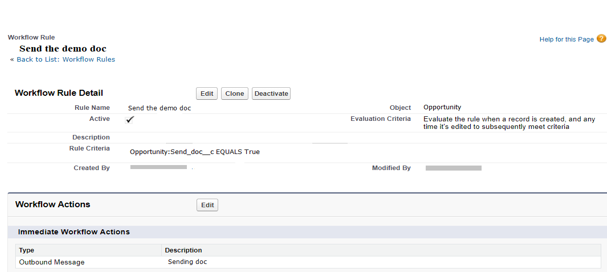
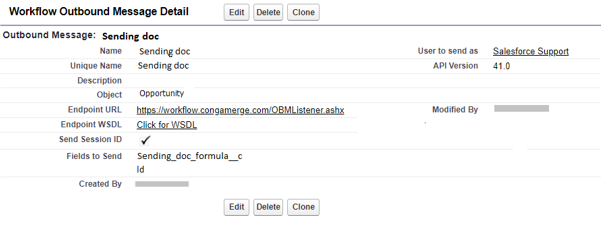
And the outbound message would look like:
What exactly are we doing in the workflow?
We include the formula field we created in Step 3, in the outbound message workflow action. (Keep note of the Endpoint URL, User to send as, Send Session ID fields)
Once the workflow is triggered, the outbound message sends the SOAP message to the designated endpoint, which in our case is the conga merge endpoint. The message contains the fields specified in the outbound message. Once the endpoint URL receives the message, it takes the information from the message and processes it, from where, it gets connected to the DocuSign endpoint and the document gets sent to the recipient from DocuSign.
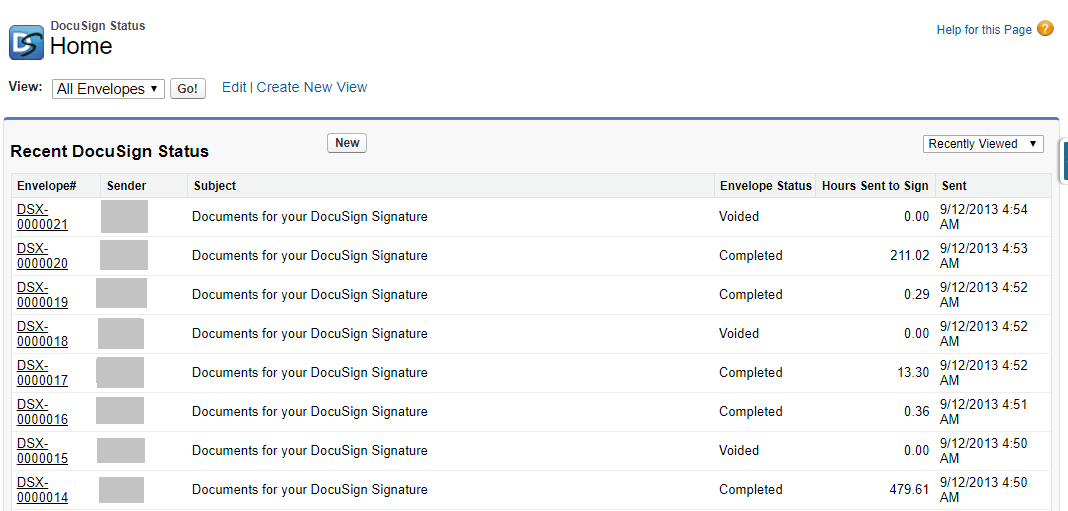
VIEWING ENVELOPE STATUS
DocuSign also lets you examine the status of envelopes and review detailed status information about individual envelopes.
- From the force.com apps menu, select DocuSign for Salesforce.
- Click the DocuSign Status tab.
DocuSign Status Home page display the default view showing the status of all your recently viewed envelopes.
When DocuSign for Salesforce is installed, DocuSign Connect for Salesforce is set up for your system (DocuSign Connect for Salesforce sets up a connection between your Salesforce account and DocuSign) and two Connect Objects, one that updates envelope status and documents (Object name: DocuSign Status ) and one that updates recipient status (Object name: DocuSign Recipient Status) , are added. Whenever selected events occur for an envelope (like envelope is in the sent, delivered or completed signing stages), DocuSign connects to Salesforce and updates the status record.
You will see the updates in Salesforce about 20‐30 seconds after the data changes or an event occurs in the DocuSign service.
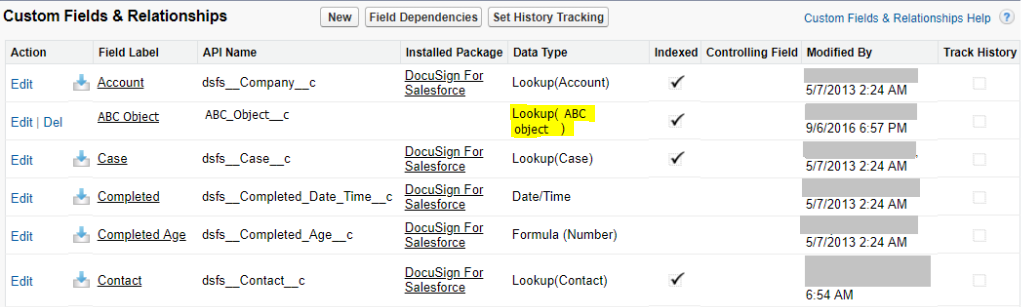
CONNECTING DOCUSIGN FOR SALESFORCE WITH CUSTOM OBJECTS
To send the envelope to a contact or lead on a custom object, establish a lookup relation between the custom object and the DocuSign Status object and perform the DocuSign Connect settings to add the object to DocuSign.
You may refer this documentation for the Connect Settings:
https://www.docusign.com/sites/default/files/DocuSign%20Connect%20for%20Salesforce.pdf
Note that the ‘Contact_dsfs’ field in DocuSign Status object has to be populated with the contact in the related custom object to whom the envelope needs to be send. For this, upon the insertion/updation of the DocuSign Status record, you can use a trigger as below:
[sourcecode language=”java”]
Set ABCSet = new Set ();
Set docuSignSet = new Set ();
list docuSignReclstToUpdate = new list ();
map ABCMap = new map ();
for(dsfs__DocuSign_Status__c docuSignStatus: Trigger.New)
{
if (Trigger.isInsert)
{
if (docuSignStatus.ABC_Object__c!= null)
{
ABCSet.add(docuSignStatus.ABC_Object__c);
docuSignSet.add(docuSignStatus.Id);
}
}
if (trigger.isUpdate)
{
if (docuSignStatus.ABC_Object__c != null && docuSignStatus.ABC_Object__c !=
triggerOldMap.get(docuSignStatus.Id).ABC_Object__c)
{
ABCSet.add(docuSignStatus.ABC_Object__c);
docuSignSet.add(docuSignStatus.Id);
}
}
}
for(ABC_Object__c bAC: [Select Id, related_Contact from ABC_Object__c Where Id =: ABCSet])
{
ABCMap.put(bAC.Id, bAC.related_Contact);
}
list docuSignStatuslist = [Select Id, ABC_Object__c, (Select dsfs__Contact__c from R00NS0000000WUO2MAO) from dsfs__DocuSign_Status__c where Id =: docuSignSet];
for(dsfs__DocuSign_Status__c docuSignStatus: docuSignStatuslist)
{
for(dsfs__DocuSign_Recipient_Status__c docuSignRec: docuSignStatus.R00NS0000000WUO2MAO)
{
if(ABCMap.containsKey(docuSignStatus.ABC_Object__c))
{
docuSignRec.dsfs__Contact__c = ABCMap.get(docuSignStatus.ABC_Object__c);
docuSignReclstToUpdate.add(docuSignRec);
}
}
}
if (docuSignReclstToUpdate.size() > 0)
{
database.update(docuSignReclstToUpdate, false);
}
[/sourcecode]
UPDATING SALESFORCE DATA
Now that you have connected a custom object to the DocuSign for Salesforce. Any workflow as mentioned above on this connected custom object, when triggered, sends the envelopes to the recipient. You can track the status of the envelopes from the DocuSign tab also. All Good! Now, what if, once the recipient completes signing the document enclosed in the envelope, you need to reflect that on this custom object record? Is that possible? Yes, it is.
One of the significant features of DocuSign is that it enables updating relevant data in your Salesforce account automatically with signed documents and collected data.
DocuSign Recipient Status object maintains a Master-Detail relationship with Status object (dsfs__Parent_Status_Record__c). Envelopes have statuses and so do Recipients. For example, an envelope has two recipients, the first has signed the document, but the second recipient has declined to sign. In this case the first recipient’s status would be signed, the second recipient’s status would be declined, and the envelope’s status is declined (since one recipient has declined).
So, to update the Salesforce record, based on a recipient’s response, you may write a trigger on the DocuSign Recipient Status object as follows. (Keep in mind to populate dsfs_Contact in this DocuSign Recipient Status object also (same as how we did for DocuSign Status object)).
[sourcecode language=”java”]
Set docuSignRecStatusId = new Set ();
Map brokerA ABCRecMap = new map ();
for(dsfs__DocuSign_Recipient_Status__c docuRec: docuSignRecStatuslst)
{
docuSignRecStatusId.add(docuRec.Id);
}
list docuSignRecStatusRecords = [Select Id, dsfs__Date_Signed__c, dsfs__Recipient_Status__c, dsfs__Contact__c, dsfs__Parent_Status_Record__r.ABC_Object__c from dsfs__DocuSign_Recipient_Status__c where Id =: docuSignRecStatusId ];
for(dsfs__DocuSign_Recipient_Status__c docuRec: docuSignRecStatusRecords)
{
if (docuRec.dsfs__Recipient_Status__c == ‘Completed’ && docuRec.dsfs__Recipient_Status__c! = oldTrigger.get(docuRec.Id).dsfs__Recipient_Status__c && docuRec.dsfs__Contact__c! = null)
{
if (docuRec.dsfs__Parent_Status_Record__r.ABC_Object__c!= null)
{
ABCRecMap.put(docuRec.dsfs__Parent_Status_Record__r.ABC_Object__c, docuRec);
}
}
}
if (ABCRecMap.keySet().size() > 0)
{
list updatelist = new list ();
list abclist = [Select Id, Status__c from ABC_Object__c where
Id =: ABCRecMap.keySet()];
for (ABC_Object__c ab: abclist)
{
ab.Status__c = ‘Agreement signed’;
updatelist.add(ab);
}
if (updatelist.size() > 0)
{
database.update(updatelist, false);
}
[/sourcecode]
In the code above, we check if the Recipient Status is set to ‘Completed’ by DocuSign, i.e., if the recipient has signed the document, and updates the status field in the related ABC_Object record.
Thus the Conga Composer-DocuSign integrated with the outbound message, enables you to send documents that carry the concerned Salesforce record data that is relevant to the recipient thus providing a personalised experience, accept the input from the recipient electronically and helps track the information thus making the entire process simple, effortless and user friendly.