QuickBooks is an acoauth2/v1/tokens/bearercounting software package developed and marketed by Intuit. QuickBooks products are geared mainly toward small and medium-sized businesses and offer on-premises accounting applications as well as cloud-based versions that accept business payments, manage and pay bills, and payroll functions.
QuickBooks Online:
Intuit also offers a cloud service called QuickBooks Online (QBO). The user pays a monthly subscription fee rather than an upfront fee and accesses the software exclusively through a secure logon via a Web browser. Intuit provides patches, and regularly upgrades the software automatically. QuickBooks Point of Sale is software that replaces a retailer’s cash register, tracks its inventory, sales, and customer information, and provides reports for managing its business and serving its customers.
How to get connected with QuickBooks before Integrating:
Create your Intuit Developer account, an app, and connect a QuickBooks Online sandbox.
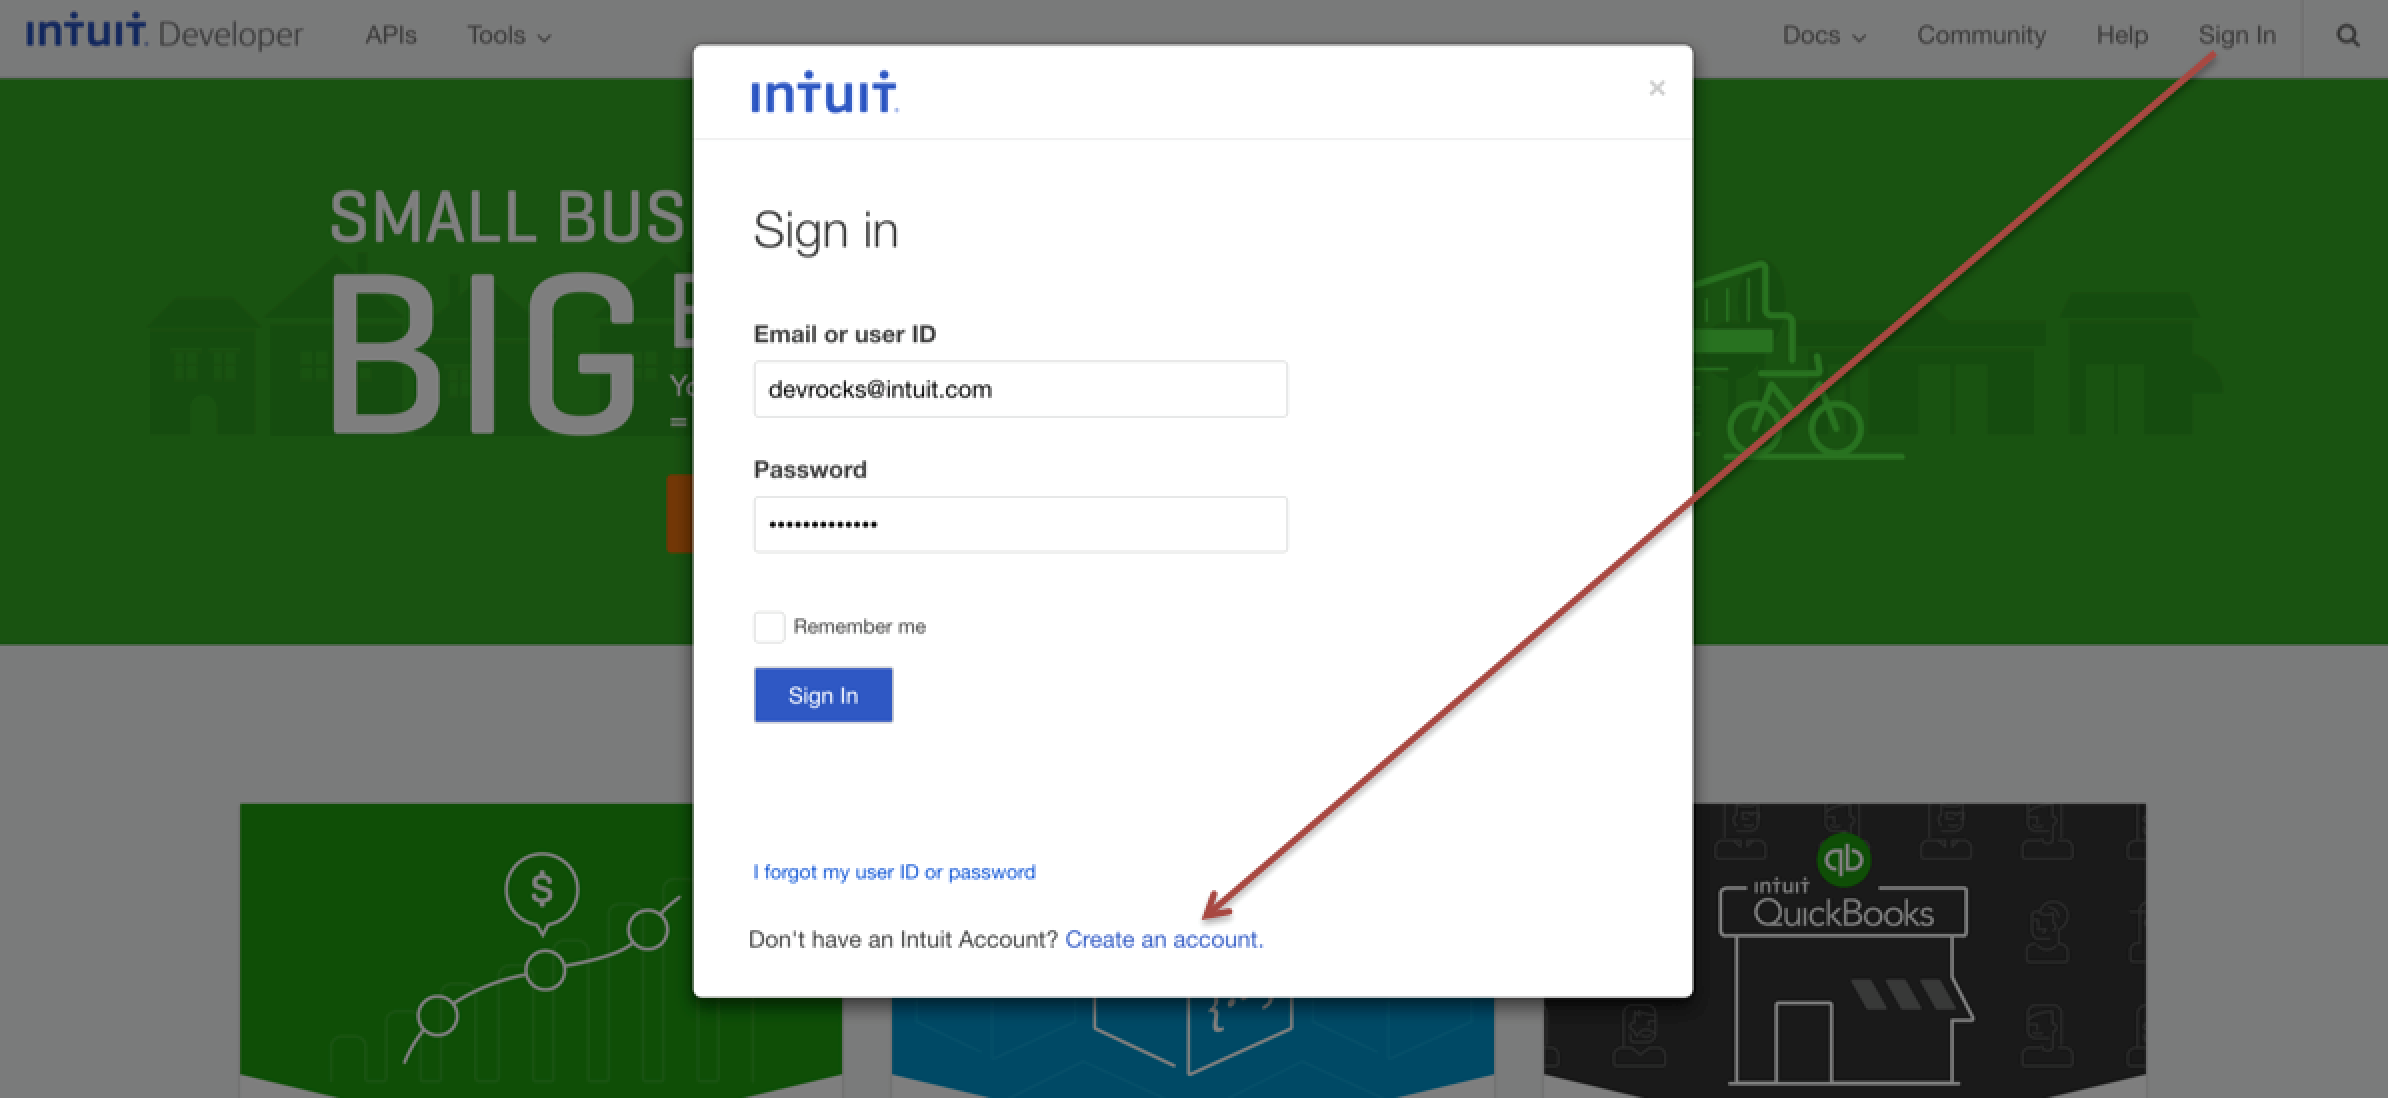
Creating your Intuit Developer account automatically provisions a QuickBooks Online sandbox. It is filled with sample data, but more importantly for our exercise, it allows you to use your Intuit Developer credentials to authorize a connection between the sandbox and an app. You can access your sandbox account from here.
Create a QuickBooks Online app and get API keys
You can create an app from the developer portal here: https://developer.intuit.com/v2/ui#/app/dashboard
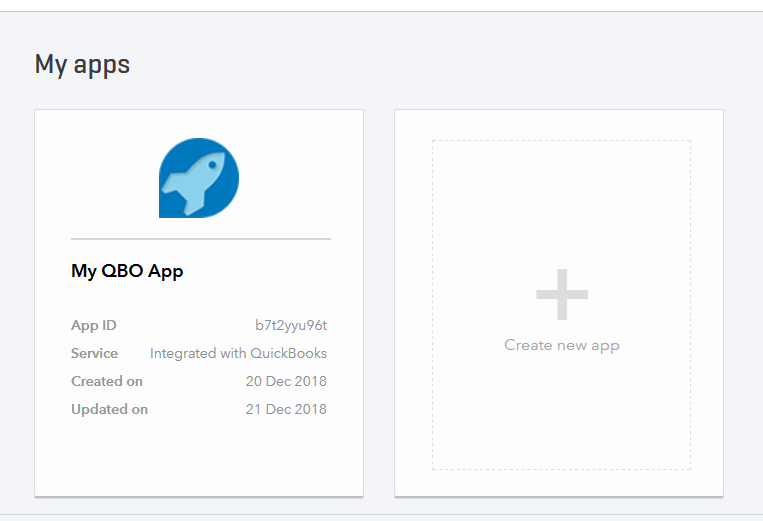
When you create an app, the Developer site creates API keys on your behalf. You are provided two sets:
- Development keys for connecting to your QuickBooks Online sandbox company
- Production keys for connecting to a QuickBooks Online production company.
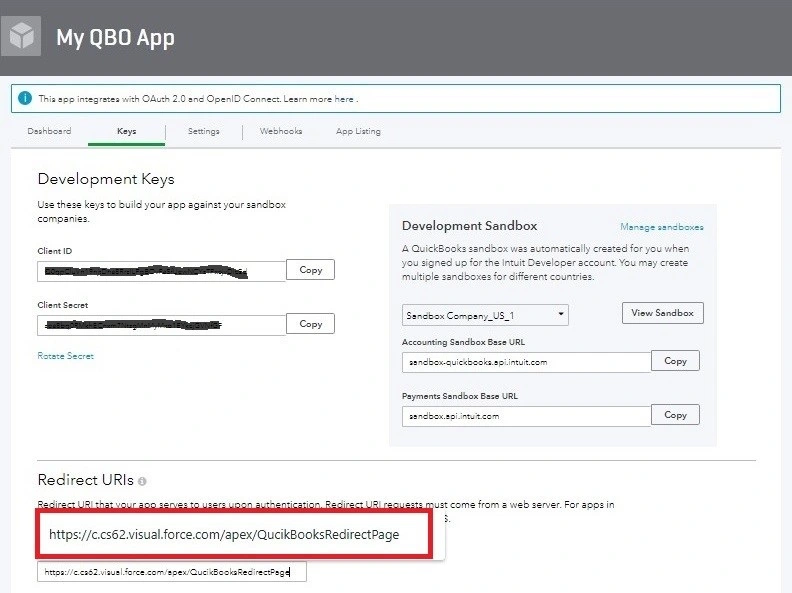
The Redirect URI is the one which we give for returning to salesforce page after successful connection to QuickBooks. Below, we use development keys to connect to a QuickBooks Online sandbox company.
Generate an OAuth 2.0 access token and refresh token for your sandbox account.
Intuit Developer provides an OAuth 2.0 playground that generates the OAuth 2.0 access token and refresh-token using the app’s API keys.
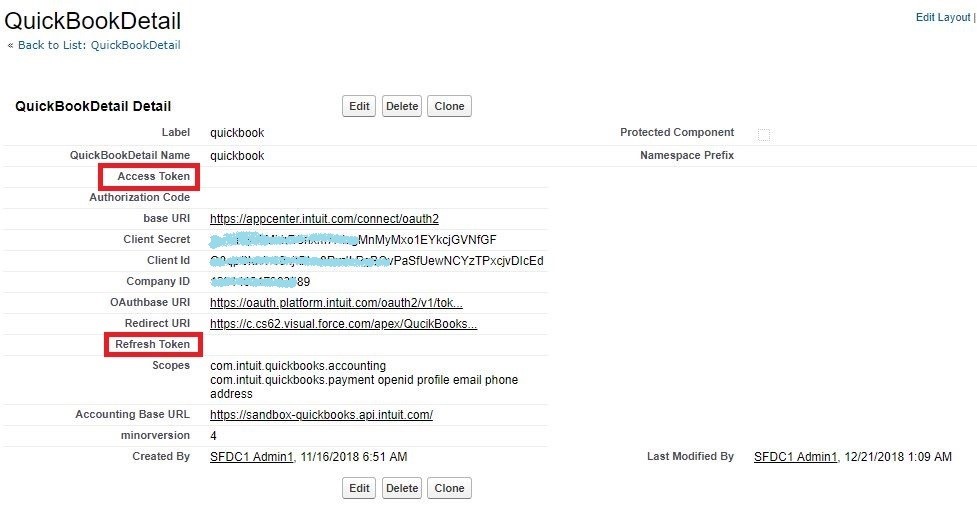
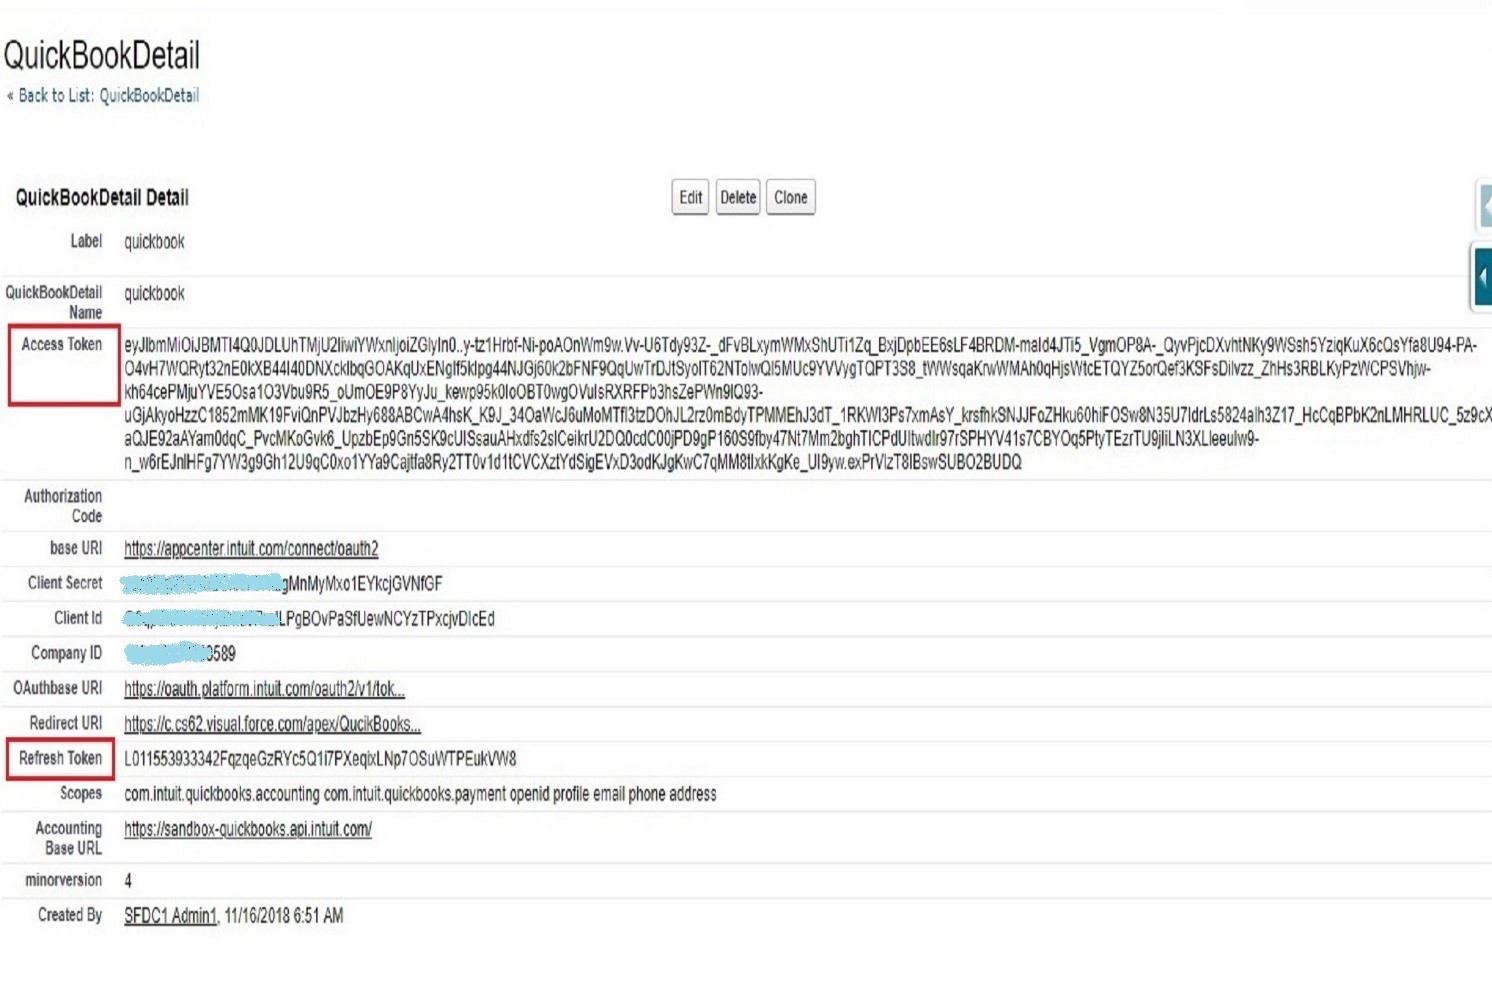
- Create a Custom Metadata object named “QuickBookDetail” and created a record named quickbook which contains all the required fields to generate the Access and Refresh Token.
- Create a Visualforce page for which a button is used effectively starting the Connection to QuickBooks. This call-back endpoint is registered as a Redirect URI on your app’s keys tab on the developer portal.
Now, configure OAuth 2.0 related variables in the Salesforce for generating OAuth 2.0 tokens.
- This example uses QuickBooks Online OAuth 2.0 token. For more details on OAuth 2.0, refer docs from here.
- Configure the Base URI and OAuthbase URI as follows.
- Enter Base URI as https://appcenter.intuit.com/connect/oauth2
- Enter OAuthbase URI as https://oauth.platform.intuit.com/oauth2/v1/tokens/bearer
- Enter Client ID and Client Secret from your app’s key tab that you created in the developer portal.
- Use ‘com.intuit.quickbooks.accounting’ as the scope. For more details on scopes, refer – OAuth 2.0 docs from here.
- State – Enter any string state that might be useful to your application upon receipt of the response. The Intuit Authorization Server roundtrips this parameter, so your application receives the same value it sent. To mitigate against cross-site request forgery (CSRF), it is strongly recommended to include an anti-forgery token in the state, and confirm it in the response. For more details, please refer – About anti-forgery state tokens. (Optional)
After completing this OAuth 2.0 workflow, Access Token and Refresh Token have been generated and saved in Custom Metadata quickbook record.
Understand token expiration:
Access tokens are valid for 60 minutes (one hour), after which you need to get a new one using the latest refresh token returned to you from the previous request. You must write your code to anticipate the possibility that a granted access token might no longer work.
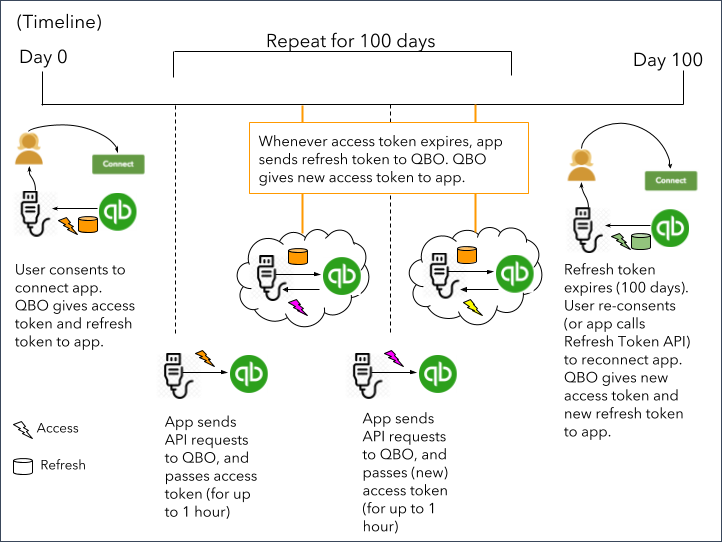
Note: An access token might stop working for one of these reasons:
- The user has revoked your app’s access: If a user revokes connection to the QuickBooks Online company, the access token and refresh token are invalidated. When this happens, your app must ask the user to reauthorize the connection as in Step 1.
- The access token has been expired: If the access token is past one hour you will receive a 401 error while making a QuickBooks Online API call. When this happens, you must request for new token using the refresh token that you received last.
- The refresh token has not been used for 100 days: The lifetime of refresh token is 100 days. When this happens, your app must ask the user to reauthorize the connection as in Step1.
- Even though the refresh token is valid for 100 days, the value of refresh token can change every 24-26hour period. Hence, you might encounter a situation where the request token that you received first is different than the latest one. As a best practice, always store the latest refresh token received from the API response and use that to make subsequent calls to obtain a new pair of tokens.
Continue to the next section to use these tokens to call QuickBooks Online APIs. How to make authenticated calls in a few simple steps:
QuickBooks Integration:
Created a visual force page and an apex class in salesforce to get the OAuth token which is used for generation of Access Token and Refresh Token. Another Visualforce Page & Apex class for redirecting it to Salesforce page after generating the Refresh Token and Access Token. Created a Wrapper Class which is used for getting the Access token and Refresh token from QuickBooks and update the values in Custom Metadata record.
Accounting API Overview:
- DEVELOPER TOOLS
First Step is to Authorize the Connection between Salesforce and QuickBooks:
- When you have logged into Salesforce, you need to create a VF tab with code written in your class. The tab is displayed as QuickBook Auth, click on it and click on Quick Books- Login button as shown below screenshot. You will be redirected to a login page of QuickBooks, where you will need to give your Login credentials of QuickBooks.

- Once you have given your credentials of QuickBooks and click on Sign In button, you will see the page like screenshot below.
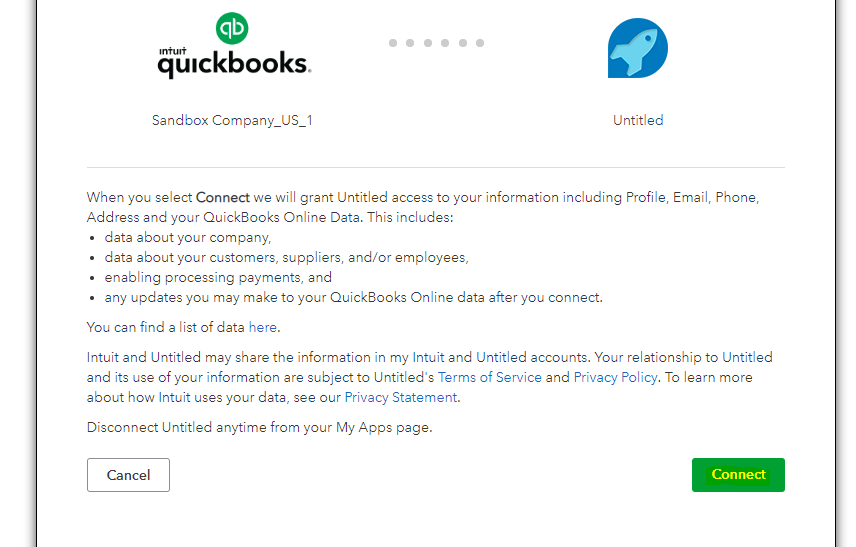
- Click on Connect. Now you will be redirected to salesforce page and it will show the authorization succeed page like below screenshot. And now you are done with integrating both the systems.

To create an Item/Product via the QuickBooks UI:
- Create an Item/Product of Type (Service).
- Select a category from the ‘Banners’ dropdown which is like a parent for the Product.
- Select an Income Account from the dropdown which is required for a product to be created.
- Check if the product is Taxable or not.
- Click on Save and Close.

Create Products via API:
To create an Item/Product via the APIs, you should use the Product Type as (Service, Inventory) and send to QuickBooks. Once it is created it will generate an ID which is used for Reference in Salesforce to identify. Example: Create an item called ‘Testing Product’ and assign it to the category ‘Testing Product 1X’. At a Start level, the steps are as follows: Creation of Parent Product (Category) in QuickBooks:
- Give the Product a Name, Product Type as (Category) and all required information and send it to QuickBooks via API.
- You will get an ID for the parent product which you have created.
Creation of Sub-Product in QuickBooks:
- Give the Product a Name, ProductType (Inventory, Service) and all required information.
- Select the SubItem as true and give the Parent reference ID for which the product type is selected as ‘Category’ in QuickBooks.
- Pass the IncomeAccountReference ID for which the product is related to which type of IncomeAccount.
- Set the parameters in the create item request and send it to QuickBooks and you will get the response as below Json.
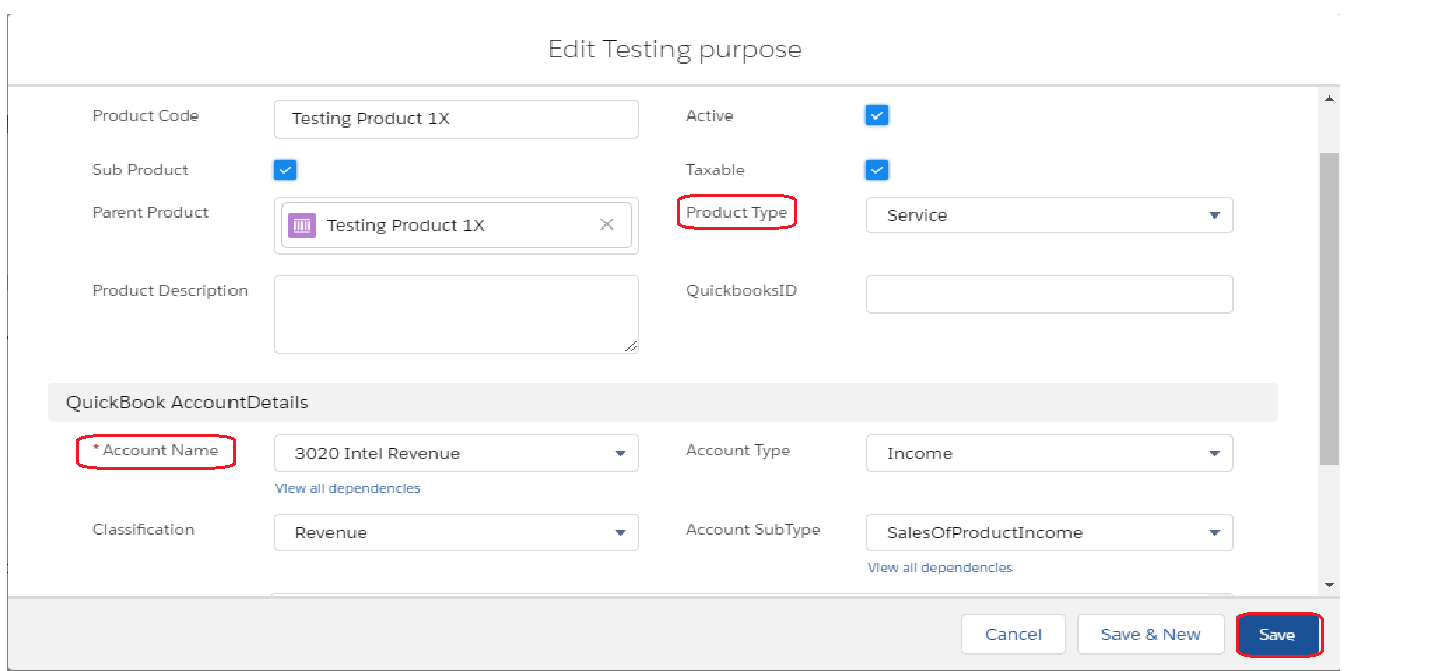
In my case, creating the Account info on QuickBooks and getting the Id from backend and I am passing the Accounts in the product page itself. Added a picklist field named Account Name and assigning the values name as Account Name and API name as QuickBooks ID which I get from QuickBooks. Below are the Json which are used for creating a product in QuickBooks. You need a create an apex class which will create a Json format for sending the request to QuickBooks. Request Json: These are the parameters sent in json format to QuickBooks for creating a product.
 {
     "Name": "Testing Product",
     "Description": "Its my sample Product",
     "Active": true,
     "SubItem": true,
     "ParentRef": {
       "value": "21",
       "name": " Testing Product 1X "
     },
     "FullyQualifiedName": " Testing Product 1X: Testing Product ",
     "Taxable": true,
     "UnitPrice": 10,
     "Type": "Service",
     "IncomeAccountRef": {
       "value": "81",
       "name": "3020 Intel Revenue"
     }
 }
Operation:https://sandbox- quickbooks.api.intuit.com/v3/company/123********3589/item/1?minorversion=4 Response: Once the product gets created in QuickBooks, If we want to see what all information was created, we can check the product by getting the Id from Developer Intuit and get the response.
 "QueryResponse": {
     "Item": [
       {
         "Name": " Testing Product ",
         "Description": "Its my sample Product",
         "Active": true,
         "SubItem": true,
         "ParentRef": {
           "value": "21",
           "name": " Testing Product 1X "
         },
         "Level": 1,
         "FullyQualifiedName": " Testing Product 1X: Testing Product ",
         "Taxable": true,
         "UnitPrice": 220,
         "Type": "Service",
         "IncomeAccountRef": {
           "value": "81",
           "name": "3020 Intel Revenue"
         },
         "PurchaseCost": 0,
         "TrackQtyOnHand": false,
         "domain": "QBO",
         "sparse": false,
         "Id": "22",
         "SyncToken": "0",
         "MetaData": {
           "CreateTime": "2018-12-17T02:07:34-08:00",
           "LastUpdatedTime": "2018-12-17T02:07:34-08:00"
         }
       }
     ],
     "startPosition": 1,
     "maxResults": 1
   },
   "time": "2018-12-17T02:08:13.756-08:00"
 }
Invoice Generation:
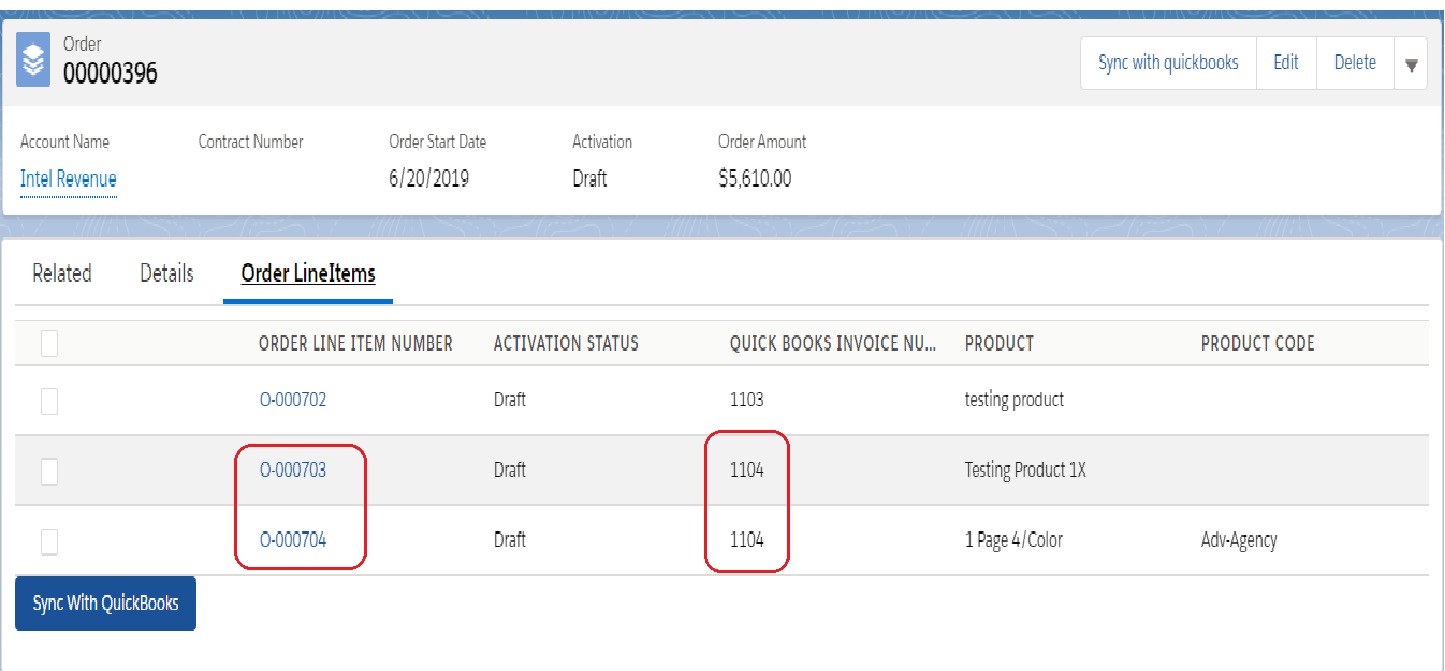
Orders: When an order is generated, it will have all the OrderLineItems which are fetched from QuoteLineItems.
- To individually generate an invoice for a Single LineItem, we can select the checkbox of OrderLineItem on the left and Click on Sync With QuickBooks Button displayed below and it will generate an invoice in QuickBooks and the Invoice Number will be displayed at the OrderLineItems Page.
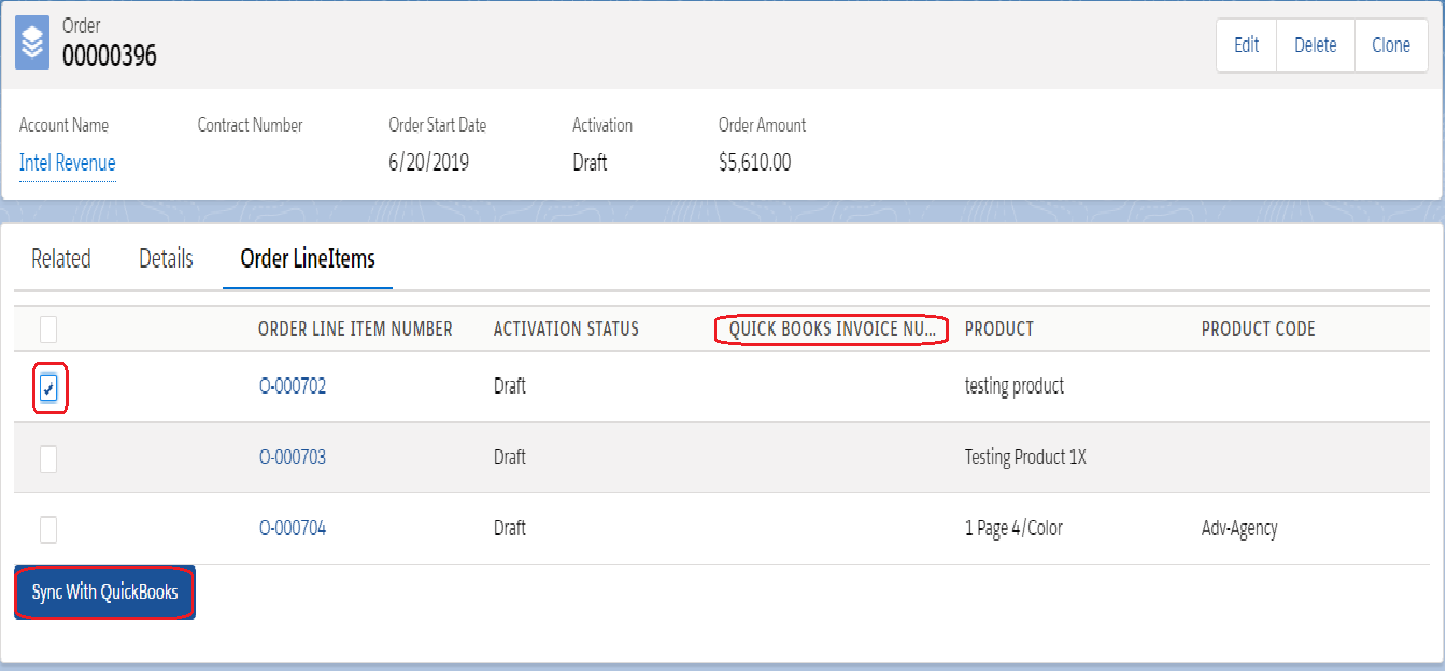
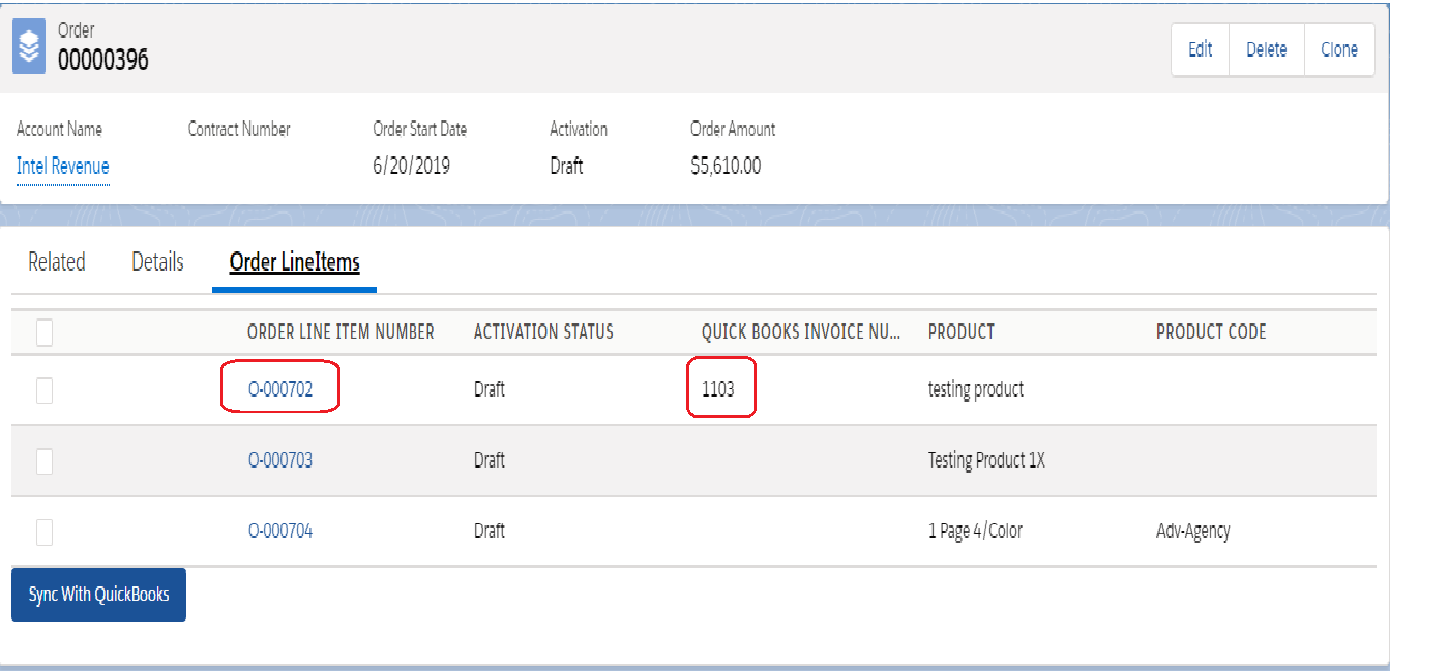
- To generate an invoice for multiple Lineitems, we can select the multiple checkbox of OrderLineItem on the left and Click on Sync With QuickBooks Button displayed below and it will generate an invoice in QuickBooks and the Invoice Number will be displayed at the OrderLineItems Page for both the LineItems with same Invoice Number.
- To Generate an Invoice for a Complete Order, the OrderLineitems which doesn’t have an Invoice Number will be considered for Complete Order Invoice and generate the invoice for Complete Order with the OrderLineItems and the Invoice Number will be displayed on both Order page and OrderLineItems page for Reference to which the order has been generated.
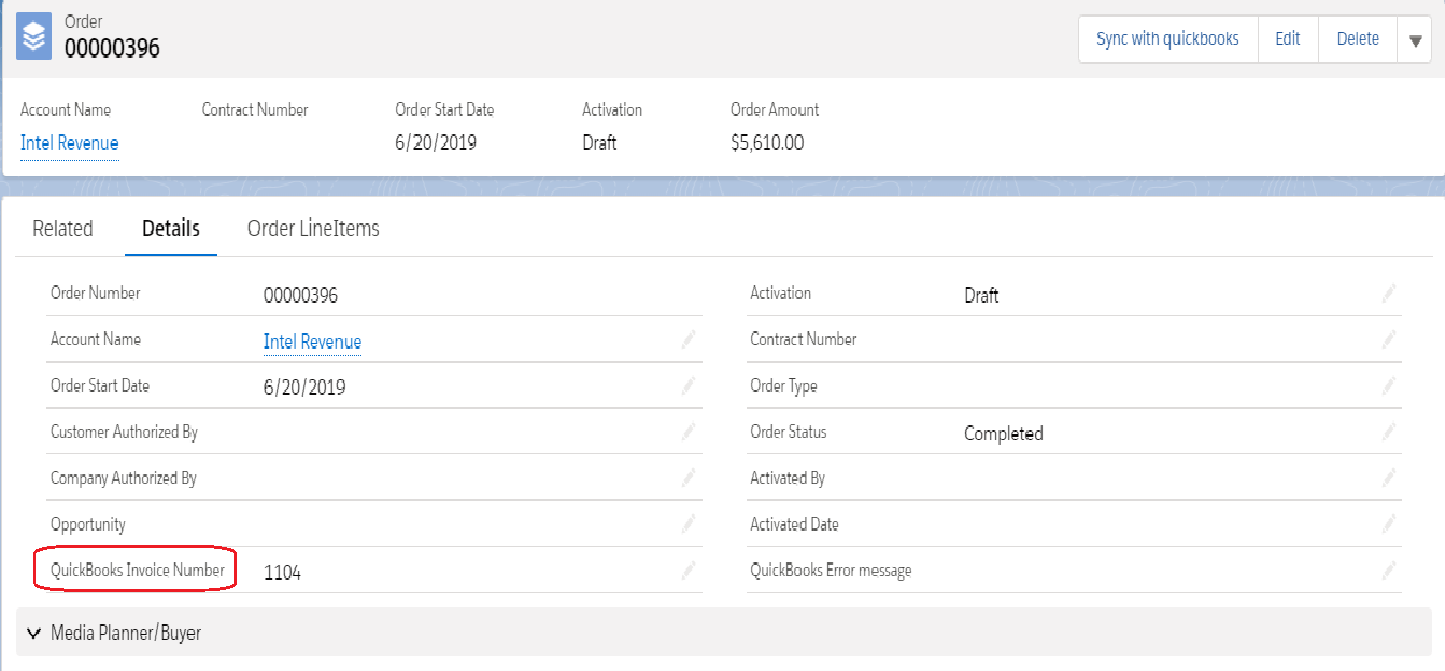
- Click on Sync with QuickBooks Button at the top, and the Invoice will be generated for complete Order with the related OrderLineItems below. You can have the reference of Invoice number at the Order page and OrderLineItems below.

MockHttpResponseGenerator Apex class: This class is required, because the invoice generation is based on WebService Callouts.
Summary:
This blog demonstrates how to integrate QuickBooks with Salesforce, creation of products in QuickBooks via API and generating invoice with the required information sent from Salesforce Orders.
Recommendation:
QuickBooks has its own API’s for Creation, Update, Query, Delete for all the Objects required. You can get the ID’s of each Product, Account, Customer from the Developer Intuit website where you can get all the Id’s of sandbox & Production data through the API Explorer, whereas you can’t get any Production data ID’s until your APP goes Live.
Limitations:
Throttling: Knowing the throttling limits and adhering to these limits will save your app from getting unnecessary 429s. Recommended API requests limit for production is as follows
- 10 concurrent requests per second per realmId
- 500 requests per min per realmId
- 40 batch requests/min per realmId, 10 payloads per batch request
Business Validation from QuickBooks:
- Product Name Length should be less than 100 Char.
- Product Type and related Account Details should be selected while sending the request to QuickBooks.